Company
In February 2020, the public learned that Boosted was going through financial troubles and on March 4th, 2020, Boosted posted a blog announcing “Today we had to make the incredibly difficult decision to let a significant portion of the Boosted team go” and “The Boosted brand will continue to pursue strategic options under new ownership”. On April 16th, 2020, Boosted’s co-founder and former CEO, Sanjay Dastoor, confirmed reports that Boosted’s assets and IP had been purchased by Lime Scooters. He also confirmed that "From a corporate structure perspective it's likely going to enter some form of bankruptcy protection at some point, but it won't formally dissolve for a while. While there was some hope of a sale or future funding when the last blog post was published, that appears to be gone".
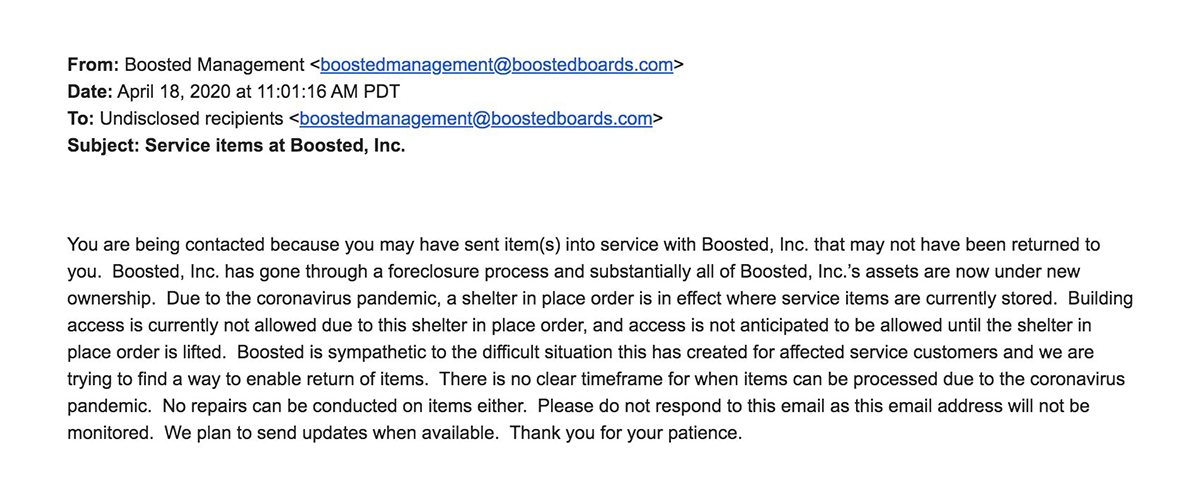
July 7th, 2020: Boosted USA managed to recover customers' products that had been previously sent to Boosted for repairs and have contacted owners via email to arrange return shipping with optional repairs:
Sanjay also put the community in contact with Michael Hillman, former VP Engineering at Boosted and now VP Engineering at Lime, who asks customers to email boostedmanagement@
Boosted USA is a reseller who bought Boosted’s remaining stock to sell online. They will not be manufacturing additional products, honouring previous warranties, or providing the same level of warranty/support. The current stock was manufactured by Boosted, but once it sells out, it will be gone for good. The company is run by Brian Schwarz, who owns a retail store in California called Last Mile SF/Calikites and previously ran Exway USA. Brian has posted a detailed story here.
Electronics
The ESC, short for "electronic speed controller" (or the motor driver), is a circuit that controls and regulates the speed of the board’s motors. It’s located in the motor driver enclosure above the rear trucks.
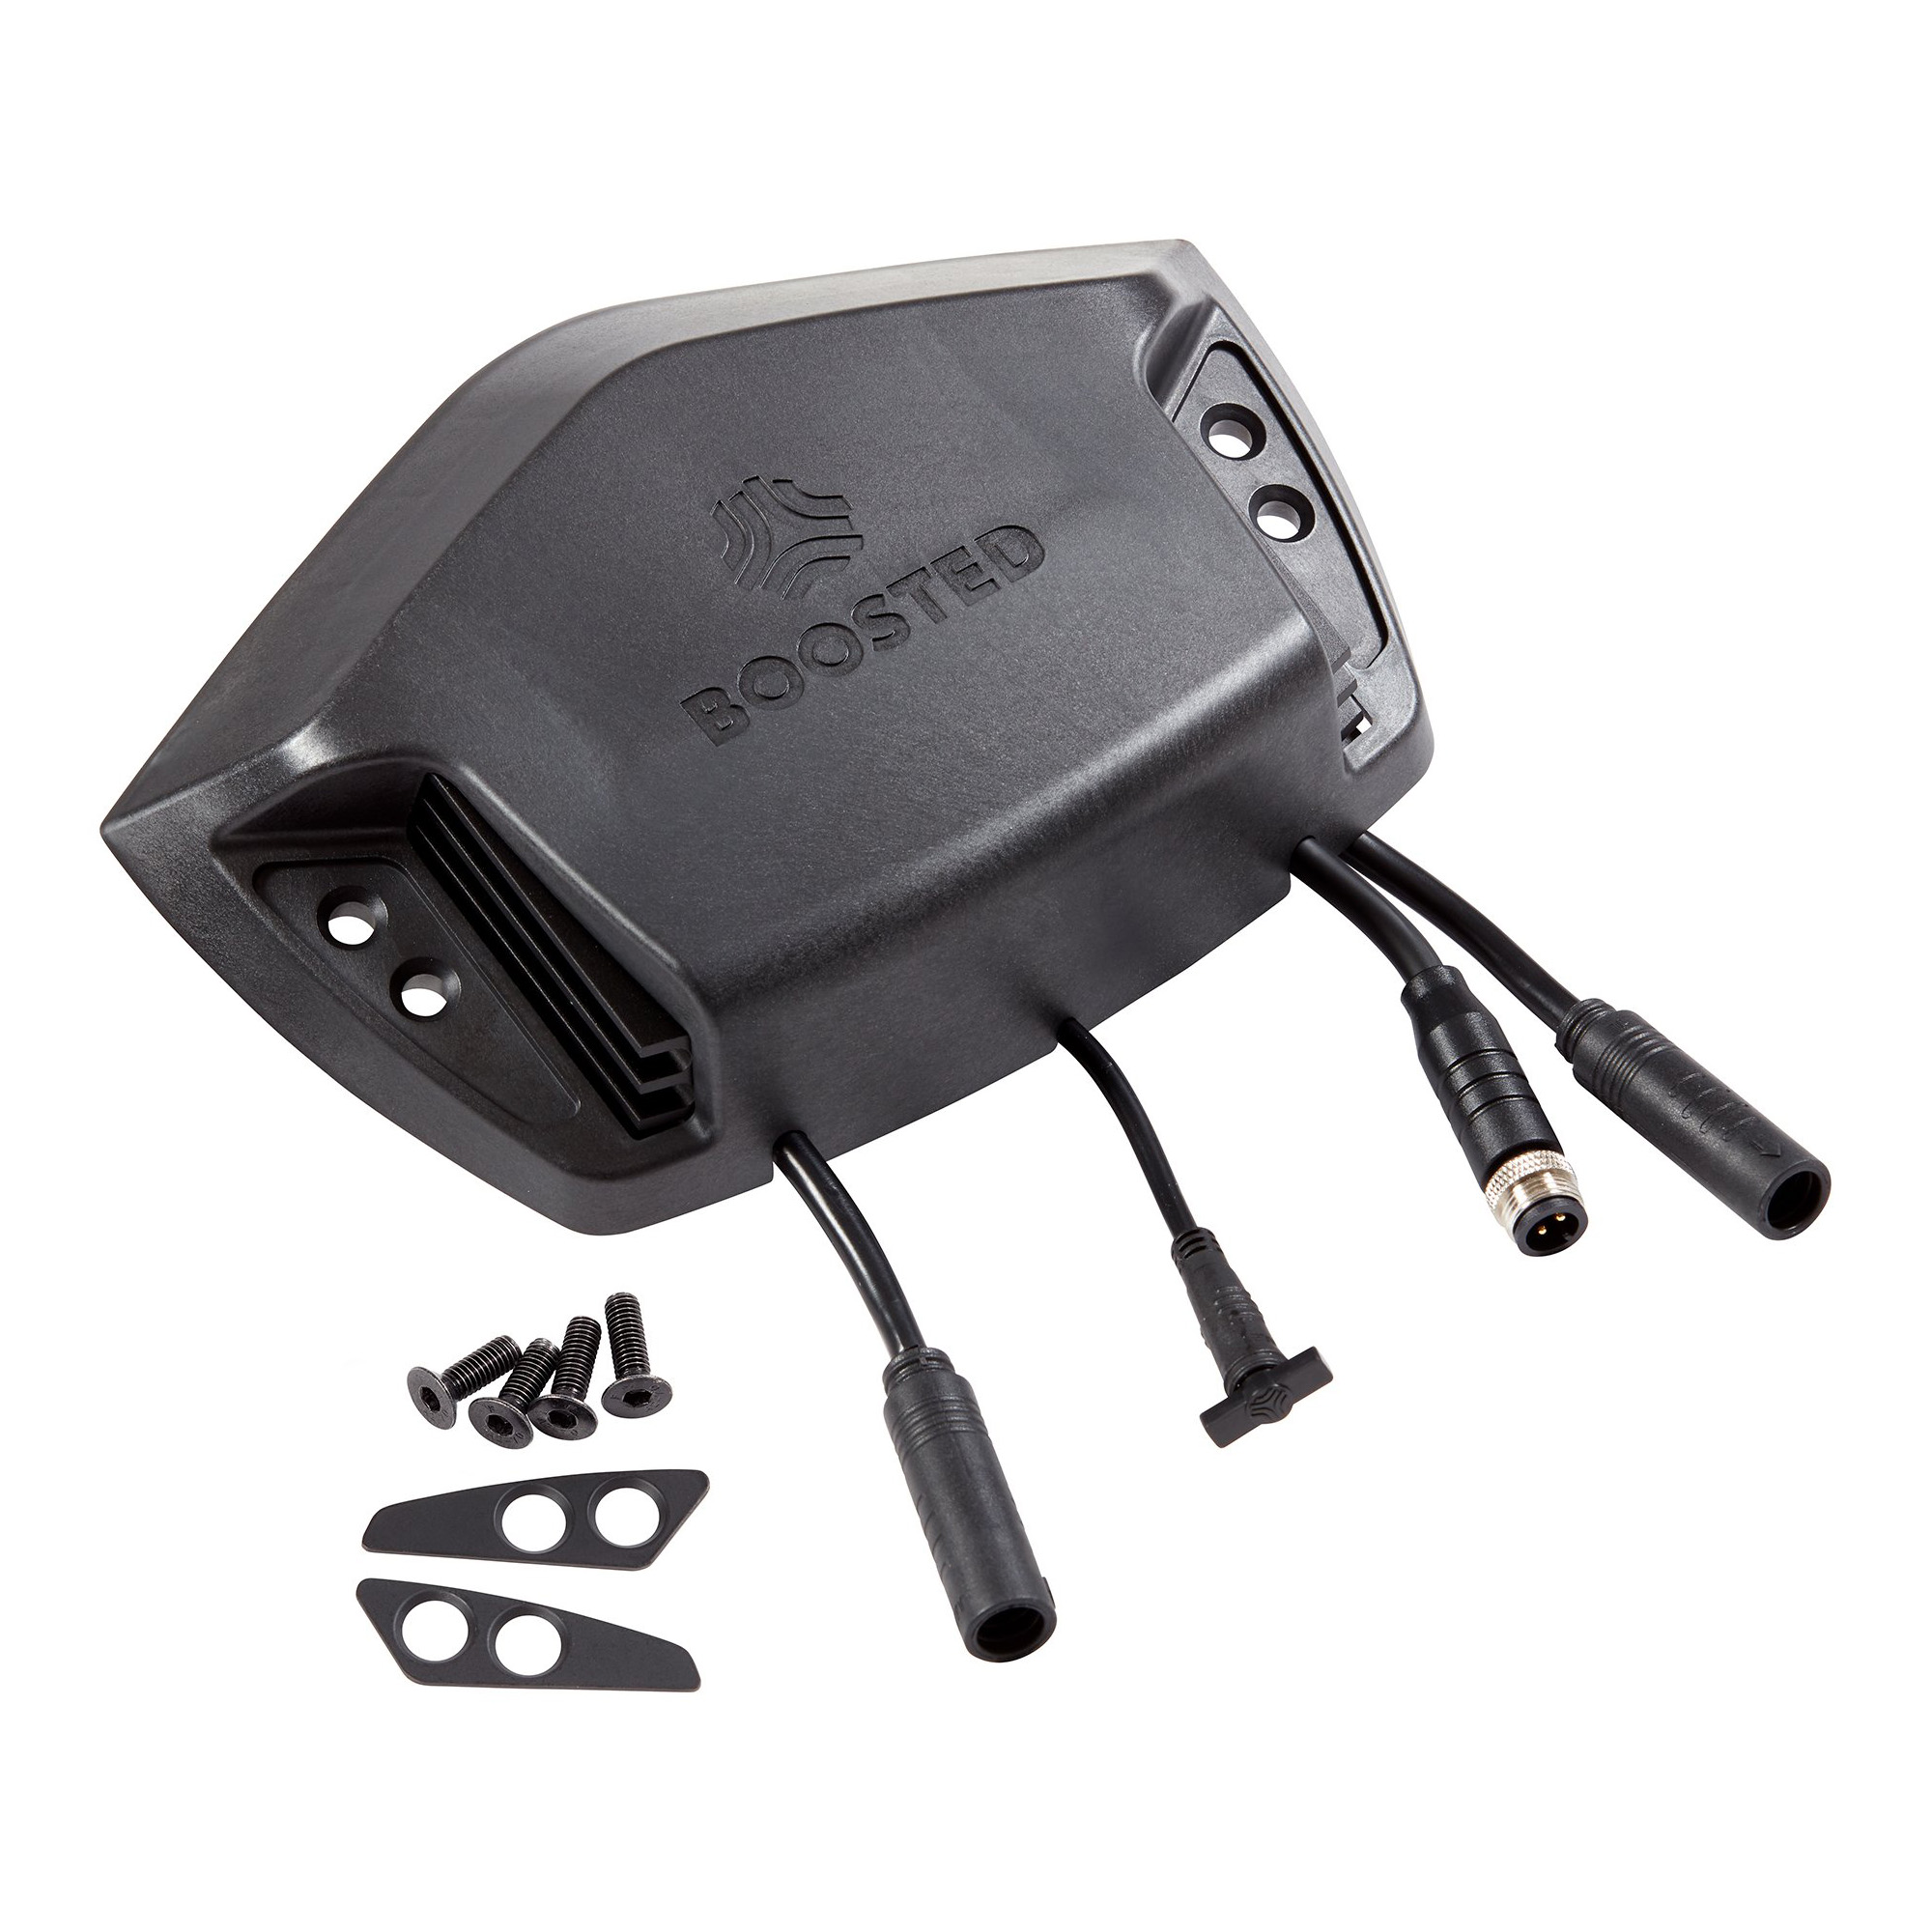
All Boosted boards, except for the v1, use the same ESC, which is interchangeable across all v3/v2 boards. The speed modes are determined by the firmware. NOTE: While the longboard ESCs will technically work on the Mini boards, they use a different enclosure, so they are not a direct swap.
Yes, the ESC/motor driver enclosure is modular and can be replaced with just a 4mm Allen wrench and Boosted's battery connector tools. After swapping an ESC, the remote will need to be re-paired with the new ESC.
- Disconnect both motors by pulling both ends of their cables that sit by the risers.
- Remove the rear truck/drivetrain assembly to free the accessory port cable from under the baseplate.
- Unscrew the enclosure and lift it off the board.
- Disconnect the front accessory port cable and ESC connector inside using the battery connector tools.
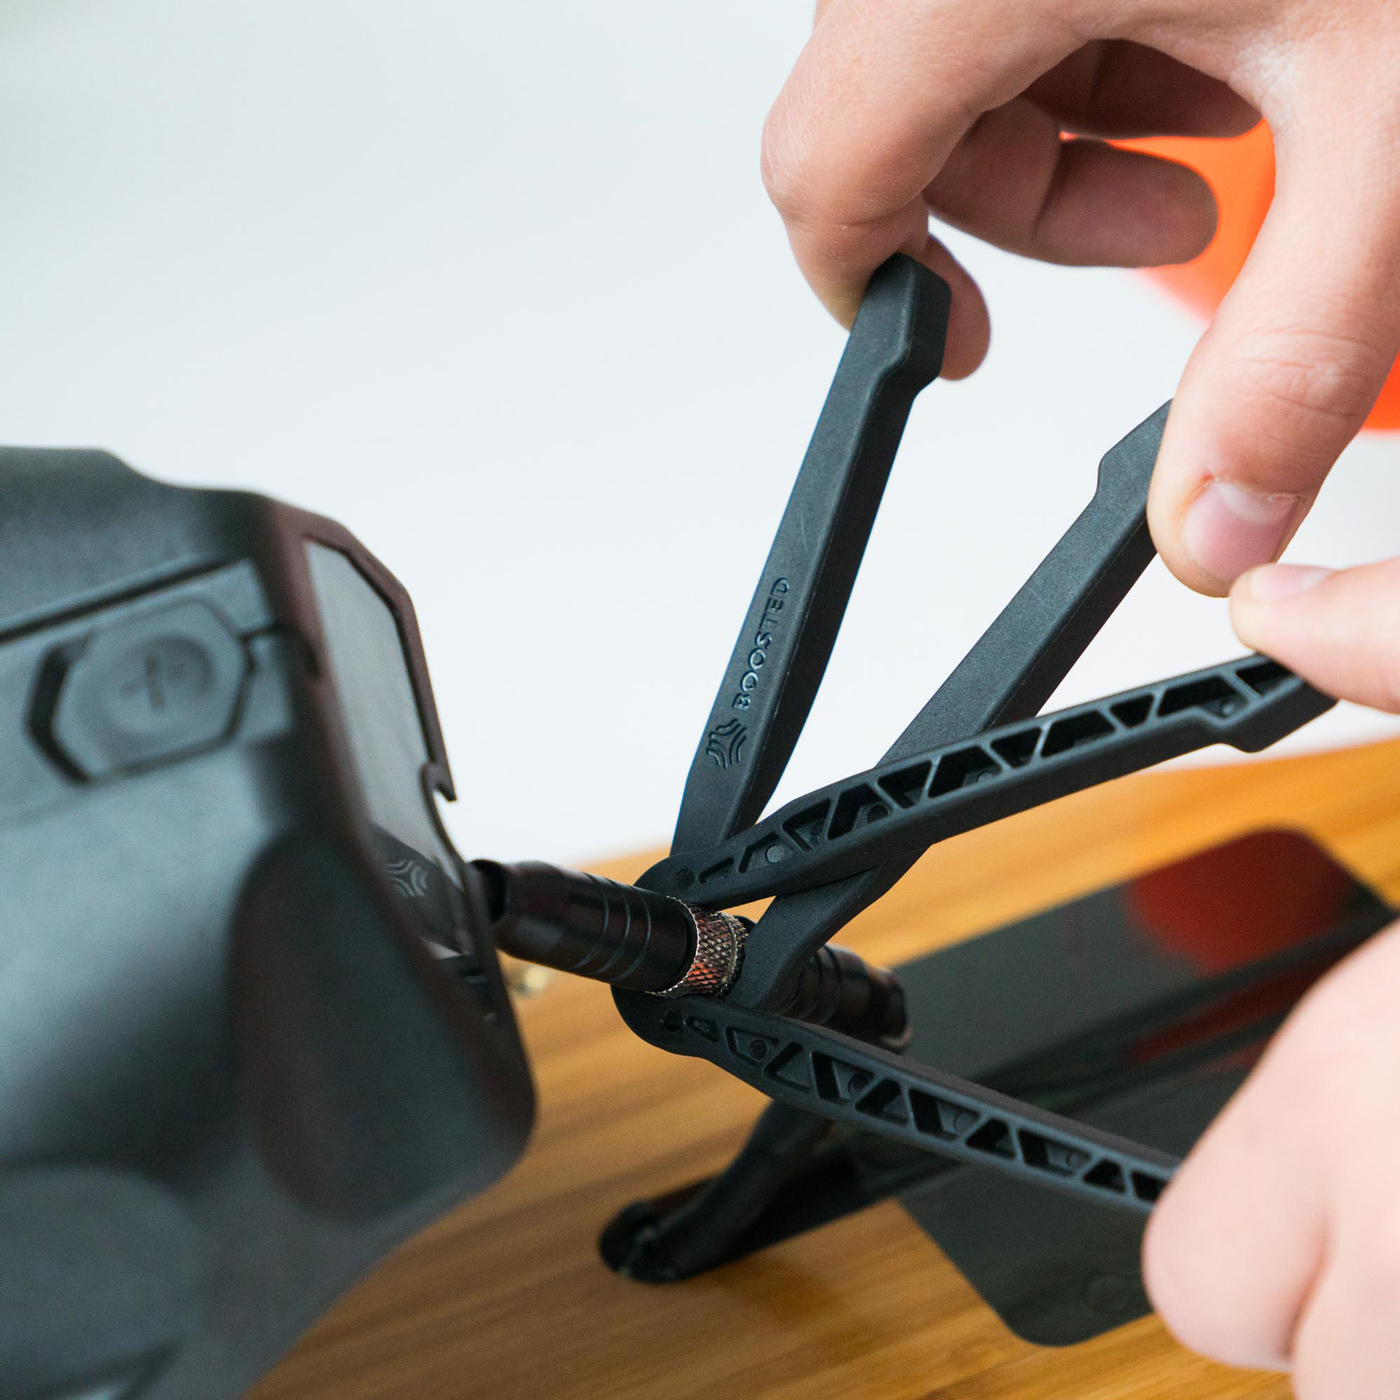
If you don't have a pair and can 3D print your own, use this file. NOTE: Do not use pliers to tighten or loosen the connectors as they will easily damage the threaded metal rings.
To install a replacement, follow the same steps in reverse.
The v3/v2 boards use brushless 5035 192kv motors with custom Hall effect sensors and a 17T motor pulley (the v1 motor has a 14T pulley). They are interchangeable between both sides of the board (left and right) and between v2 and all v3 boards (Stealth, Plus, and Mini).
All standard range batteries across all v2 and v3 boards are the same. Likewise, all extended range batteries across all v2 and v3 boards are the same. This means that the standard range battery works on all v3/v2 boards while the extended range battery can be installed on all v3/v2 boards, except for the Mini S as it does not fit on the deck due to the motor driver placement. The v1 battery is not removeable or swappable. NOTE: Older v2 boards need to be manually updated to ESC firmware v2.1.9 to work with an extended range battery.
Batteries should be swapped using Boosted’s battery connector tools. If you don't have a pair and can 3D print your own, use this file. NOTE: Do not use pliers to tighten or loosen the connectors as they will easily damage the threaded metal rings.
The standard range (SR) battery uses A123 26650 LiFePO4 cells in a 12S1P configuration (12 cells total) and the extended range (XR) battery uses LG HG2 18650 Lithium Ion cells in a 13S2P configuration (26 cells total).
It’s up to you. There are third-party 4-amp chargers, which will charge the XR battery almost twice as fast as a stock charger, but keep in mind the faster you charge a battery, the shorter its lifespan becomes. The SR battery A123 26650 cell can be charged at up to approximately 8-10 amps with an estimated lifespan of 1,000 cycles.
v3/v2 standard and extended range batteries can be charged while on or off the board and the power button will turn yellow (not green) when fully charged. The battery cannot be charged off the board for v1 boards.
Generally speaking, it is not recommended to store Lithium Ion batteries fully drained or fully charged as they last longest with moderate charge. You should store your board indoors and charged at approximately 20-80%. The battery should also be charged every 6 weeks as all batteries self-discharge a small amount, which can cause a cell voltage imbalance, and your battery may drain so low that it becomes damaged.
All v3/v2 remotes can pair with all v3/v2 boards, however, only remotes with serial numbers starting with R28 or R29 can enable Hyper mode on the Stealth. Most remotes that shipped with v2 board start with R26 or R27. The v3 remote has a shinier finish. To pair a remote, press the button on the remote five times and the board's power button five times too – they should automatically pair and the remote LED will turn blue. The v1 remote does not work with other boards.
The v1 charger can also charge a standard range battery, but cannot charge an extended range battery; the v3/v2 charger can charge all Boosted batteries.
At the moment, the authentication/firmware servers are down and as a result, boards cannot be automatically updated. The latest ESC firmware is v2.7.2 and the latest battery firmware is v2.5.1.
It's preferable to be running the latest version of the battery firmware (v2.5.1) and ESC firmware v2.7.0 or later as it enables the board's accessory port for use with Beams (the latest version is v2.7.2 with additional connection bug fixes). The latest battery firmware balances the cells better by showing 100% charge when the delta is <100mV and maintains the balance better while not in use by tolerating a delta of ~1.0V. According to a former Boosted employee, batteries on firmware older than v2.5.1 had a higher failure rate and approximately 30% of batteries were serviced.
Parts
v3/v2 boards use custom Gates 225-15-3m belts lined with felt to reduce noise. v1 boards use 219-15-3m (belt length - belt width - tooth pitch). You can buy standard Gates belts for v3/v2 boards directly from suppliers such as V Belts Direct, Biedler's Belts, Royal Supply, and V-Belt Guys.
Belts typically last an average of 200-400 miles (~320-650 kilometres), but can also last much longer or less depending on your riding style and the riding conditions. If you are an aggressive rider, brake hard frequently, ride down large hills, or you ride in very gravely conditions, your belts may need replacement more frequently. Over-tensioned belts can also rip prematurely.
The v3 longboards (Stealth/Plus) use a slightly stiffer 38" (L)/11.3" (W) composite deck and the Mini (X/S) boards use a "Deep Dish" 29.5" (L)/11" (W) composite deck. Both have a poplar spine wrapped in triaxial fibreglass and edges reinforced with a polymer sidewall. The longboard deck also contains vibration-dampending foam.
The v1 and v2 boards use a custom Loaded Flex 3 Vanguard (38"/98cm) deck, which is intended for speeds between 0 and 25 mph (0-40km/h). Due to its flexibility, it is not intended for higher speeds.
All decks are rated for use by riders up to 250 lbs (113 kg).
All of the v3/v2 longboard components (battery, motor driver, and drivetrain) mount exactly the same and use the same wiring, so they are all direct swaps across pre-wired v3/v2 longboard decks.
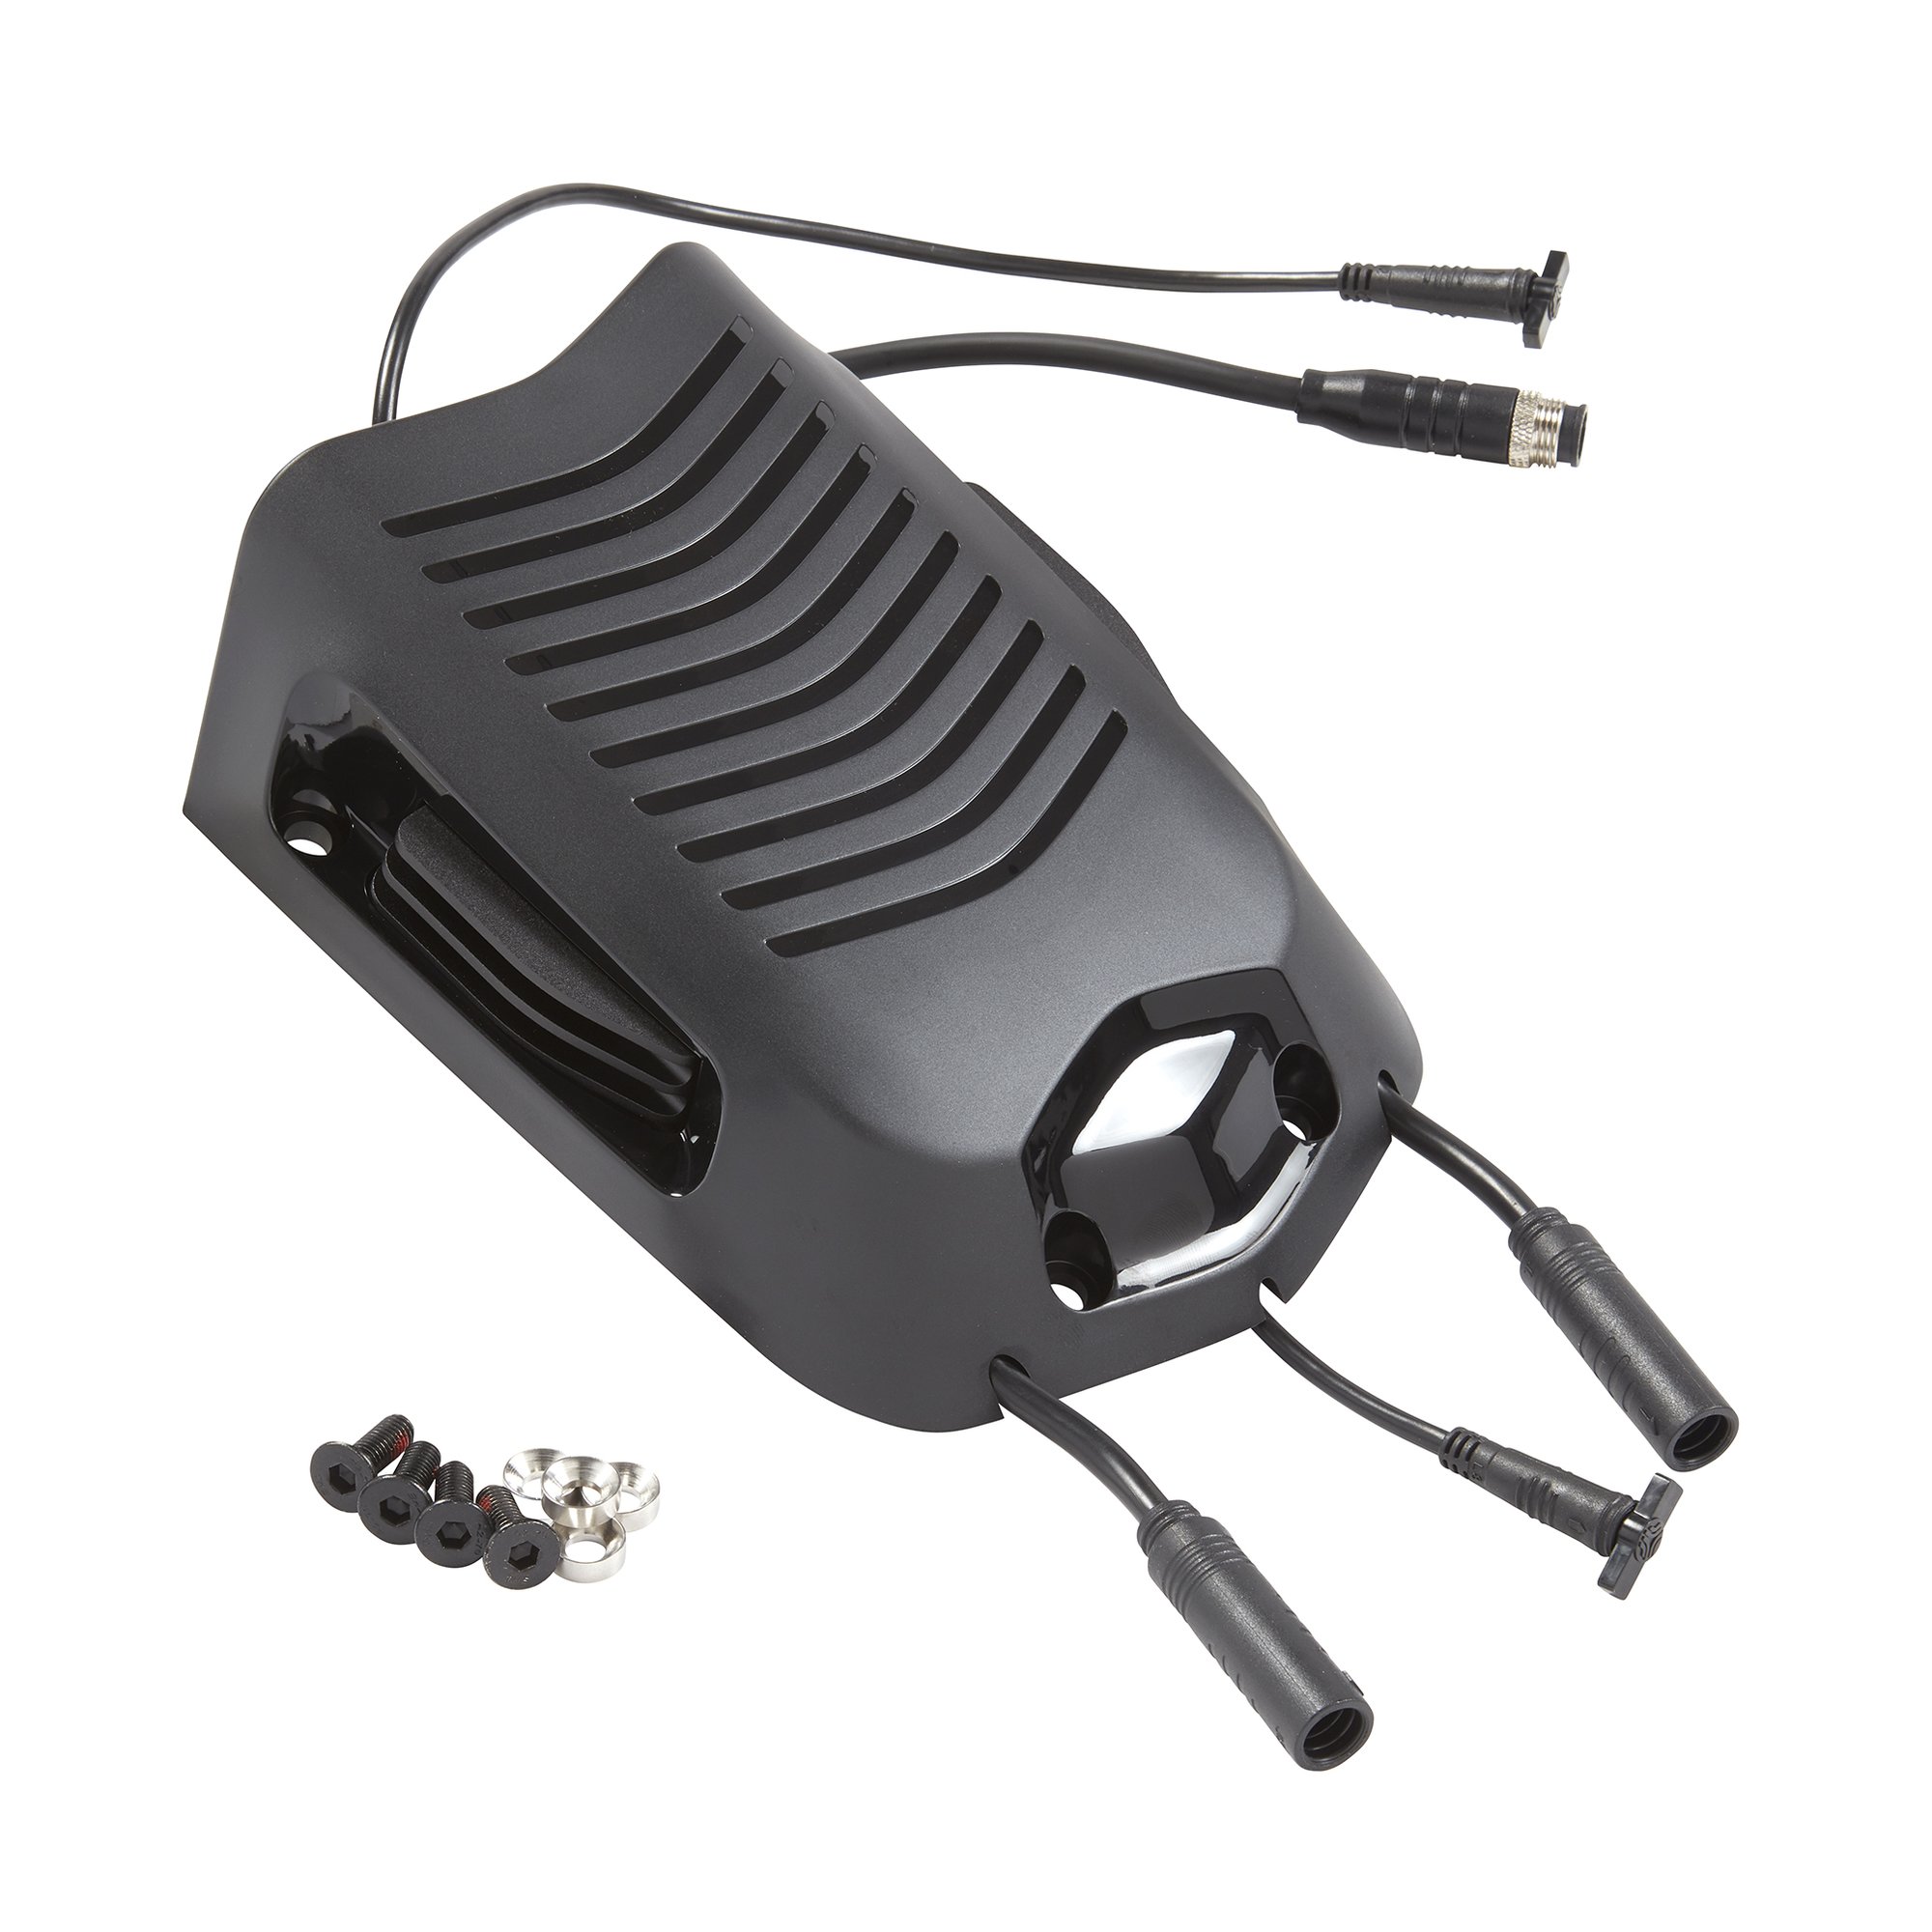
The Mini S and X use different motor driver enclosures and cables, which only fit on their respective decks and not on any other decks without drilling custom mounting holes and installing your own threaded inserts. This would also be necessary to swap onto a non-Boosted deck.
If you need to extend the connection between your battery and motor driver or route your deck like a Boosted deck, you can use a HIGO-L513-A-B battery cable and a 4-pin extension cable for the accessory port.
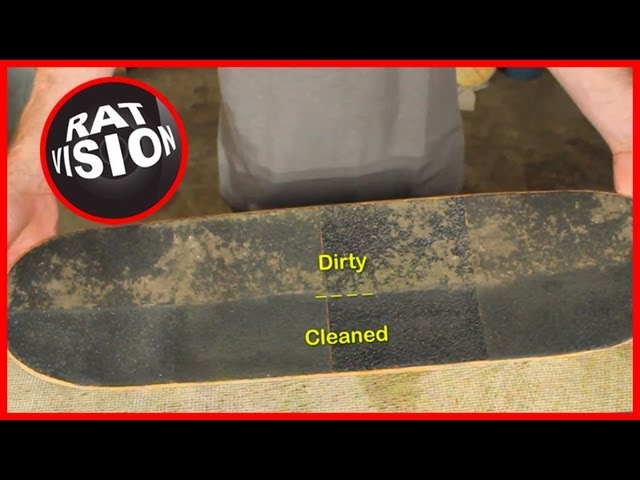
You can clean surface dirt/dust off your grip tape using natural rubber, which is sold as Grip Gum for skate/longboards or sanding belt cleaner in hardware stores. For deeper cleaning, you can use a brass wire brush and water to loosen the dirt.
Clean Skateboard & Longboard Grip Tape
First, make sure that the new sheet of grip tape is big enough to cover your deck (deck sizes here). Then, you can remove your existing grip tape using a heat gun or a hair dryer by holding it a few inches away from the deck and pulling the grip tape away as it starts to loosen. The v2 Dual+ grip tape is applied as two separate sheets. v1 boards have wires running under the grip tape, so special precaution is needed to change it without causing damage to the wiring. You can design your own grip tape on Splattergoat.
The v3/v2 boards use custom 190mm (hangar width)/50° (baseplate angle) trucks with a rakeless hangar and the v1 uses 50° Caliber IIs. “Rakeless” means that the hanger can face either direction, but for visual reasons, it is installed with the circle facing down. The v2 trucks are cast while the v3 are forged.
You can use a 180mm/50° truck on the front, such as a Paris v3/v2, but the rear truck assembly uses Boosted’s custom motor mounts. 180mm is the closest size as 190mm is not a common longboard truck width. You can also use a third-party baseplate with the v3/v2 rear truck, such as a 50° Caliber baseplate to match the front.
Yes, you can use third-party barrel or cone bushings. Orangatang Nipples are a popular option. For reference, the stock v3/v2 longboard bushings are 86a (black) and the Mini are 90a (grey).
Risers (AKA riser pads) provide extra ground clearance for the battery and for bigger wheels to avoid wheel bite (when the wheels make contact with the deck), especially on the Mini deck, which doesn't have the same cut-outs as the longboards. Risers also affect the ride experience by making you feel higher off the ground, which can also provide more turning leverage. Your set-up ultimately comes down to personal preference. v3/v2 boards with extended range batteries use a 1/2" riser while older v2 boards used a 1/4" riser. Boosted recommended that riders over 175 lbs (79 kg) install the taller risers.
Shock pads are rubber risers (typically, 1/8") that dampen vibrations while riding and protect the deck from shock. They can be used in combination with risers and should sit against the truck base plate for best results.
Yes, these parts are modular, so they can be replaced with new or 3D printed ones. They are also symmetrical, so they can be flipped between both sides. You can also 3D print your own skid plates using these files.
Battery: The battery screws are M6 x 12mm (diameter)/20mm (length), which are 90° countersunk and take a 4mm Allen wrench. Buy: McMaster-Carr.
ESC/Motor Driver: The motor driver wing plate screws are M6 x 12mm (diameter)/18mm (length), which are 90° countersunk and take a 4mm Allen wrench. Buy: McMaster-Carr.
Motor Caps (Belt Covers): The socket cap screws for the motor cap are M4 x 0.7mm (thread pitch)/10mm (length), which take a 3mm Allen wrench (the v1 socket cap screws take a 9/64" Allen wrench). Buy: Amazon, The Home Depot, McMaster-Carr.
Skid Plates: The skid plate screws are M4 x 0.7mm (thread pitch)/6mm (length), which take a 3mm Allen wrench. Buy: Amazon, McMaster-Carr.
Belt Tensioning Screws: The belt tensioning screws on the motor mounts are M4 x 0.7mm (thread pitch)/6mm (length) and take a 3mm Allen wrench. Buy: Amazon.
Truck Hardware: The stock truck hardware on boards with a standard range battery is 1.25” (length) and on extended range boards, it's 1.5” (length). Buy: Loaded, MuirSkate.
Truck Mounting Nuts: The truck mounting nuts are standard skateboard/longbord truck mounting nuts, which #10-32 (diameter - thread count) and take a 3/8" wrench. Buy: Bolt Depot.
Truck Kingpin Nuts: The truck mounting nuts are standard skateboard/longbord truck mounting nuts, which are 3/8"-24 (diameter - thread count) and take a 9/16" wrench. Buy: Bolt Depot.
Wheel Pulley Bearings: The v3/v2 pulleys use 6903-2RS bearings on the inside; the v1 uses 6804-2RS. Buy: eBay
Wheel Pulley Washers: The big silver wheel/drive pulley washers on v3/v2 trucks are 18.25mm (approximate inside diameter) x 25mm (outside diameter) x 0.5mm (thickness). Buy: McMaster-Carr.
Long Axle Spacers (only used on v2/v1 trucks): The long cylindrical axle spacers are 8mm x 19mm (length).
Wheel Bearings: The wheels use standard 10.29mm (0.405", width) skateboard/longboard bearings for 8mm axles, however, the rear wheels cannot use bearings with built-in spacers on the inside, such as Zealous. Other options, such as Bones Reds, don't have built-in spacers.
Bearing Spacers (only used on front wheels): The bearing spacers are 8mm x 10mm (made for 8mm axles), which are commonly used on skateboards/longboards. Buy: MuirSkate.
Speed Rings: The speed rings sit on the inside and outside of the front wheel bearings, but only on the outside of the rear wheel bearings. They are standard skateboard/longboard speed rings. Buy: MuirSkate.
Axle Nuts: The axle/wheel nuts are standard skateboard/longbord axle nuts, which are 5/16"-24 (diameter - thread count) and take a 1/2" wrench. Buy: McMaster-Carr.
Wheels
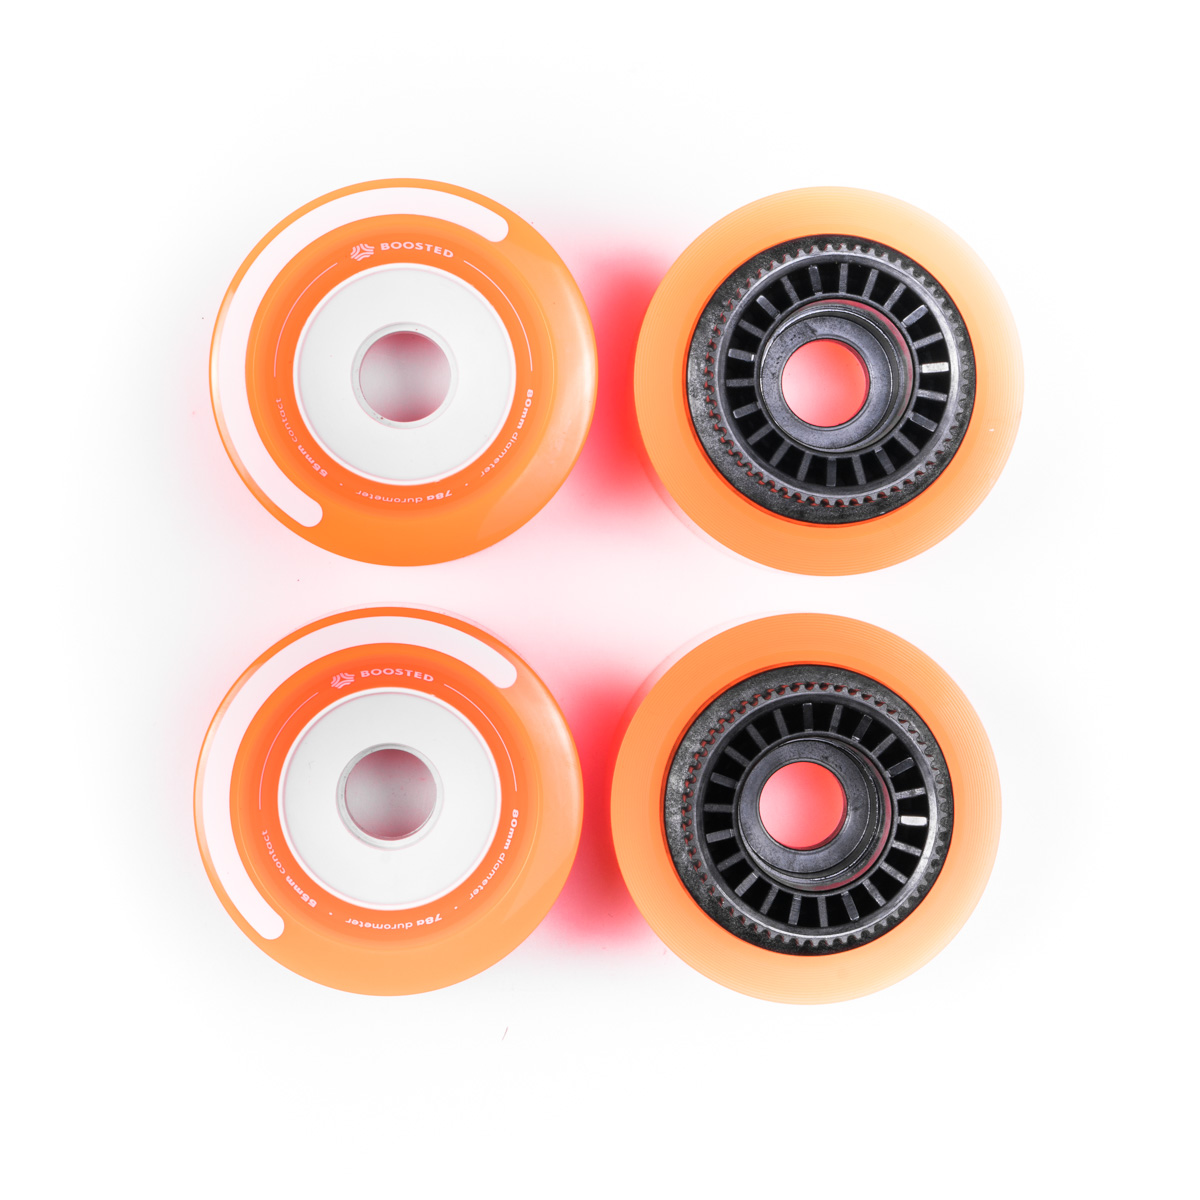
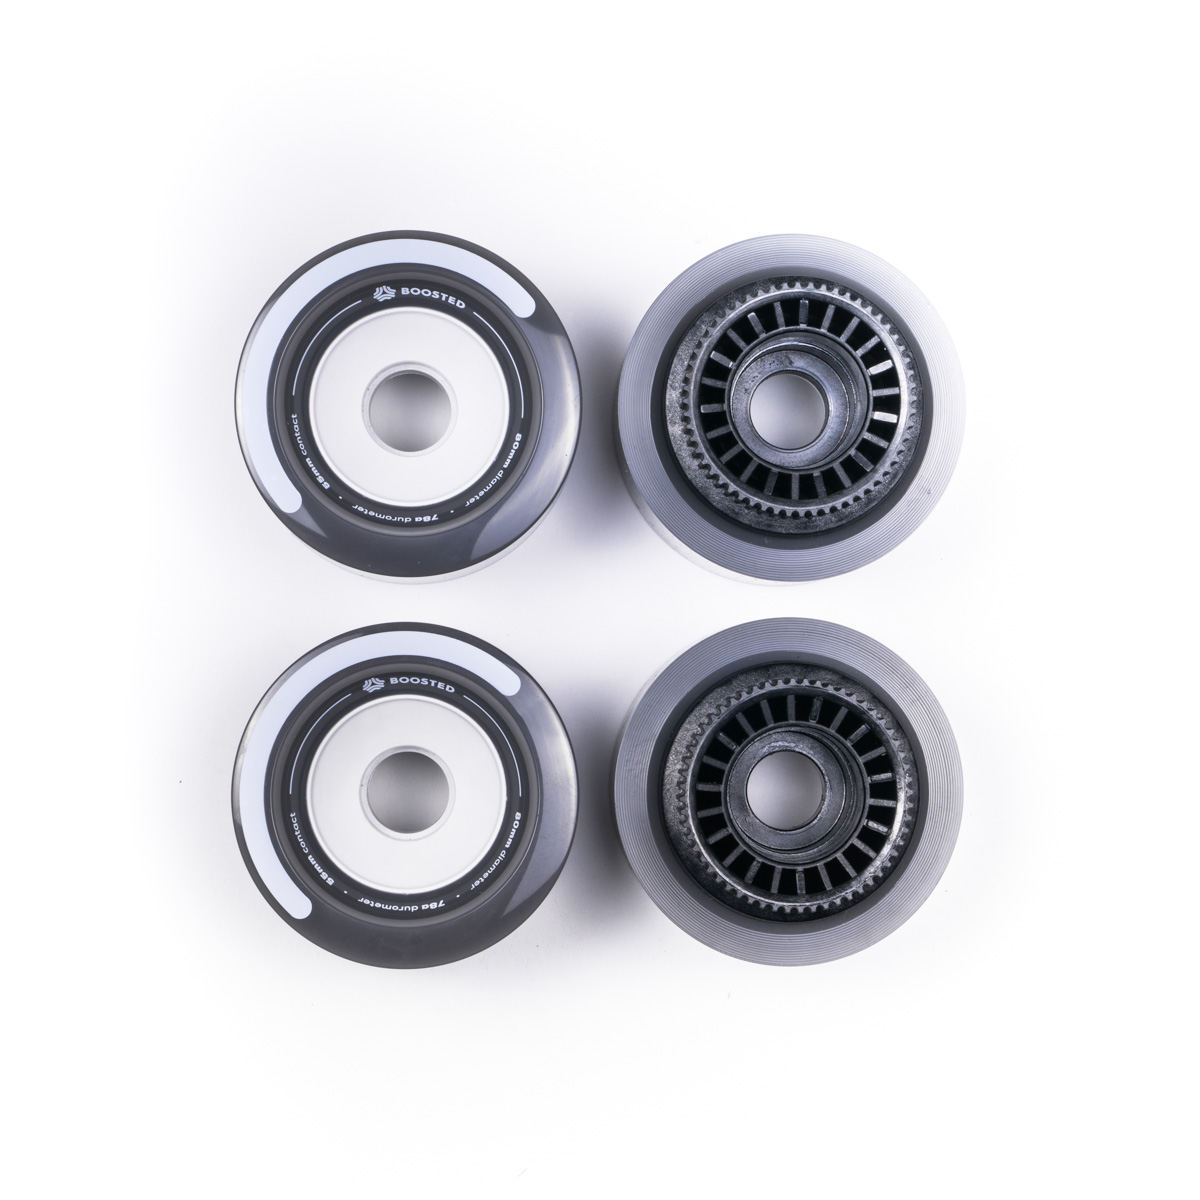
v3 longboards (Plus/Stealth): Boosted 85mm/78a Stratus, orange and grey respectively.
Mini S/X: Boosted 80mm/78a Lunar, orange and grey respectively.
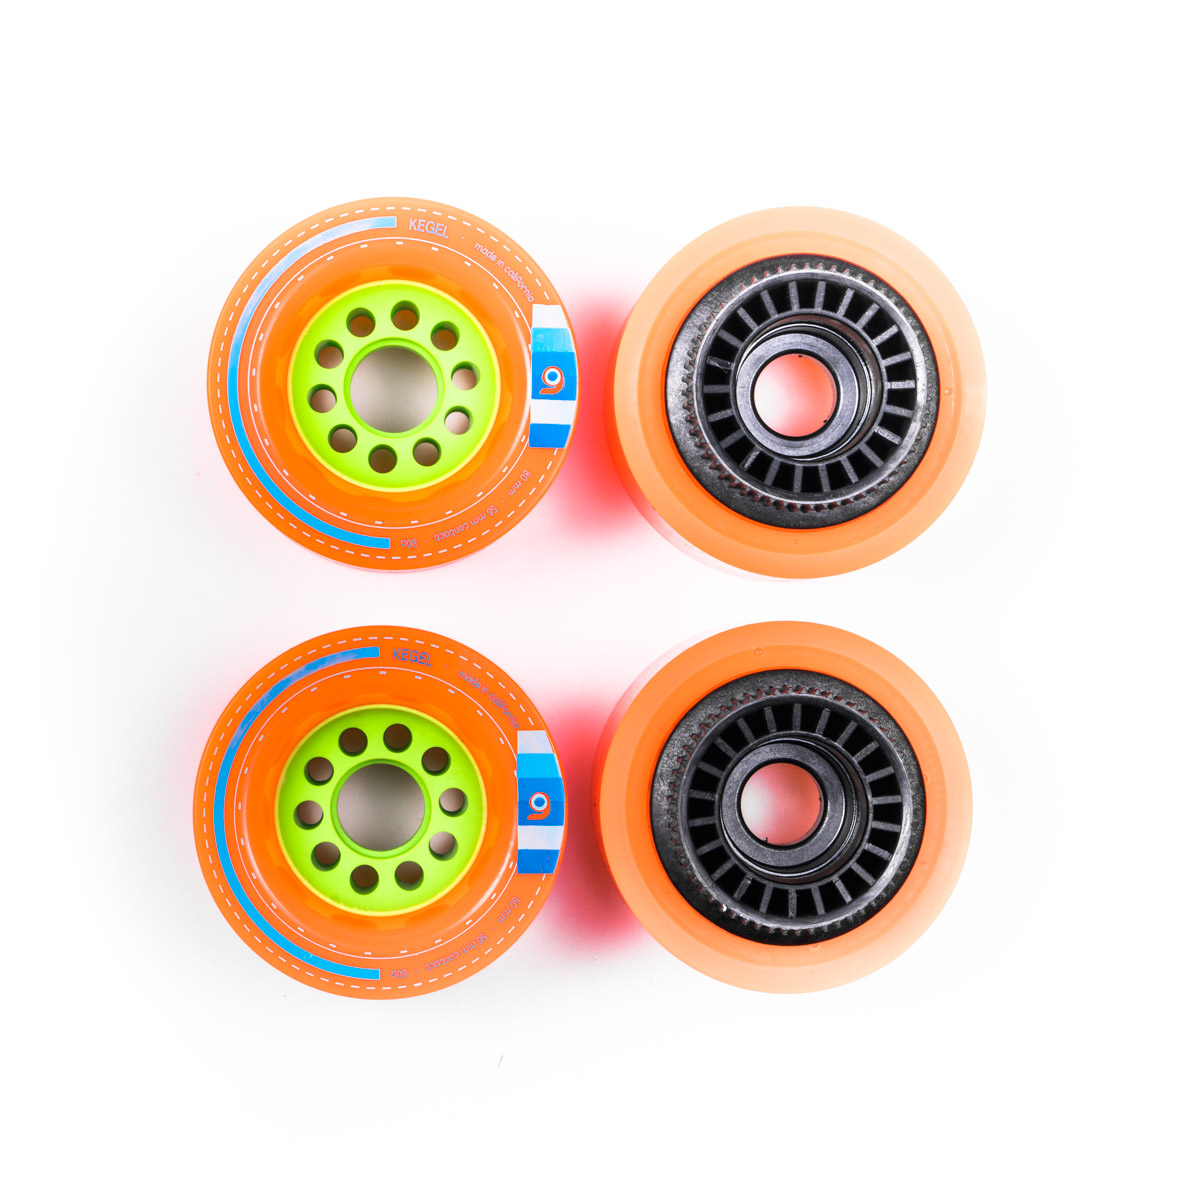
v2: Orangatang 80mm/80a Kegel.
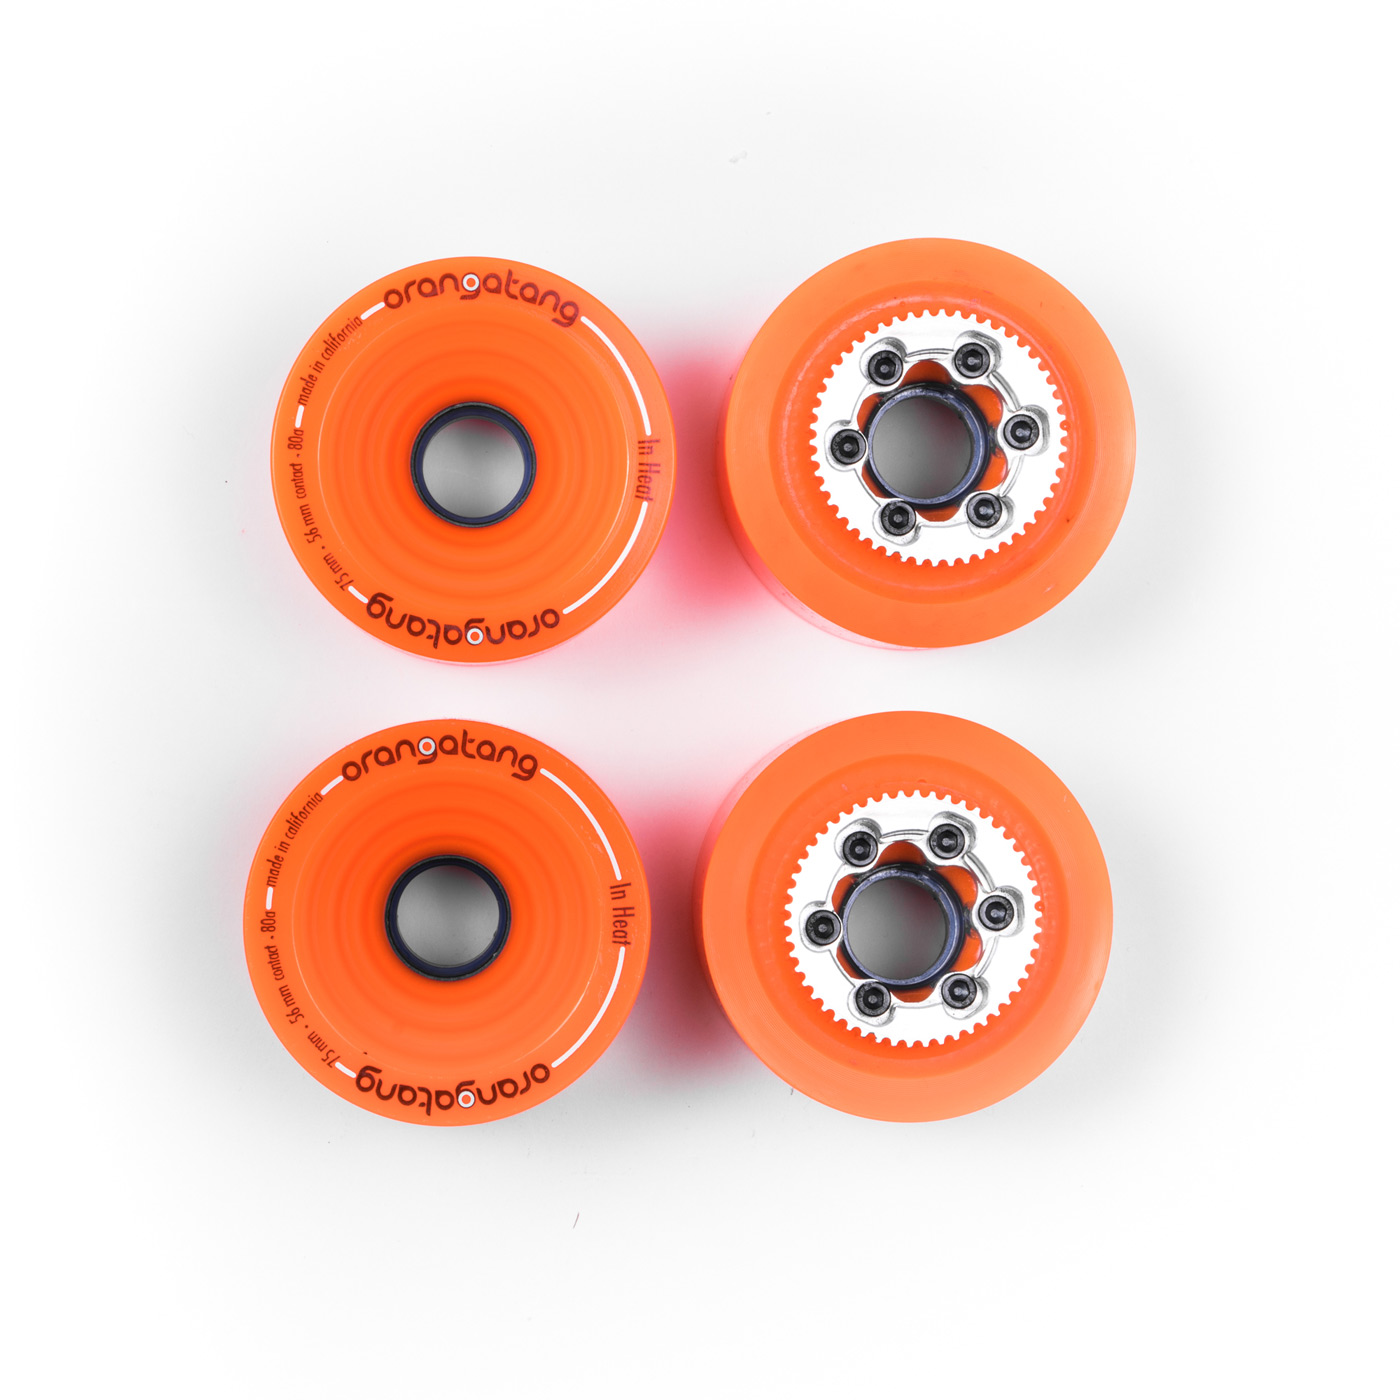
v1: Orangatang 75mm/80a In Heat.
If the wheels have a Kegel core, you can use the stock wheel pulleys by carefully prying them off with a flathead screwdriver. Make sure to remove and use the big pulley bearings too. Depending on the wheel width and core placement, you may be able to still use the stock motor caps (the metal pieces that cover the motors and part of the belts). If the wheels don’t leave enough clearance, you’ll have to remove the motor caps or use custom motors caps like the ones included here. If the wheels use an ABEC11 core, you’ll need to use custom wheel pulleys such as these. Keep in mind that a narrower contact patch decreases traction while a wider contact patch may drain more battery.
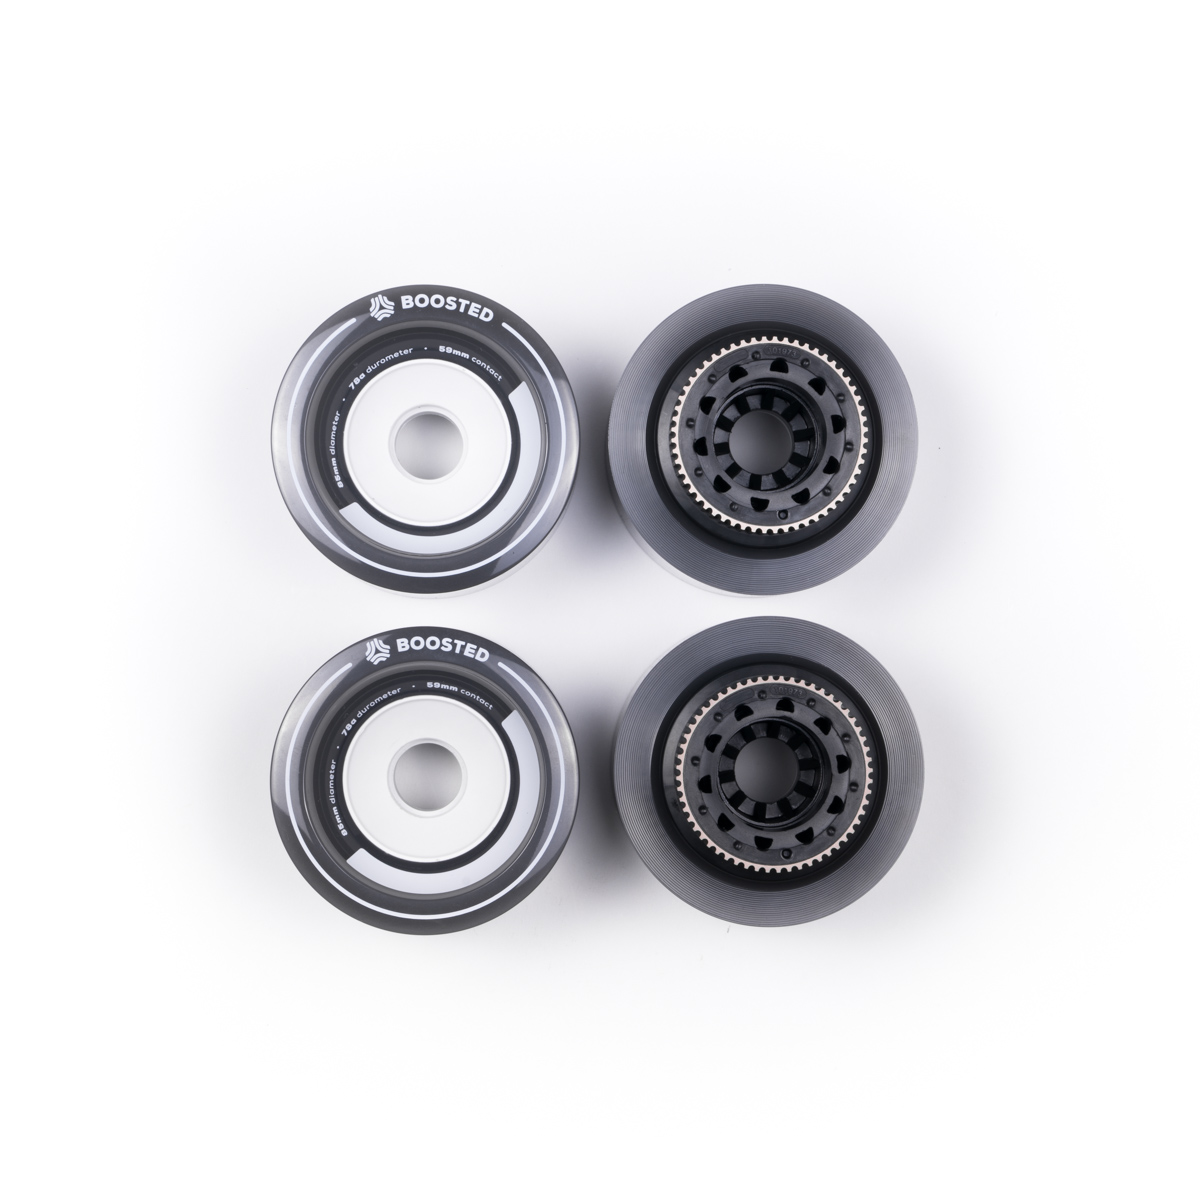
This is an Orangatang Kegel and the core is the green plastic part in the centre, where the pulley sits from the inside.
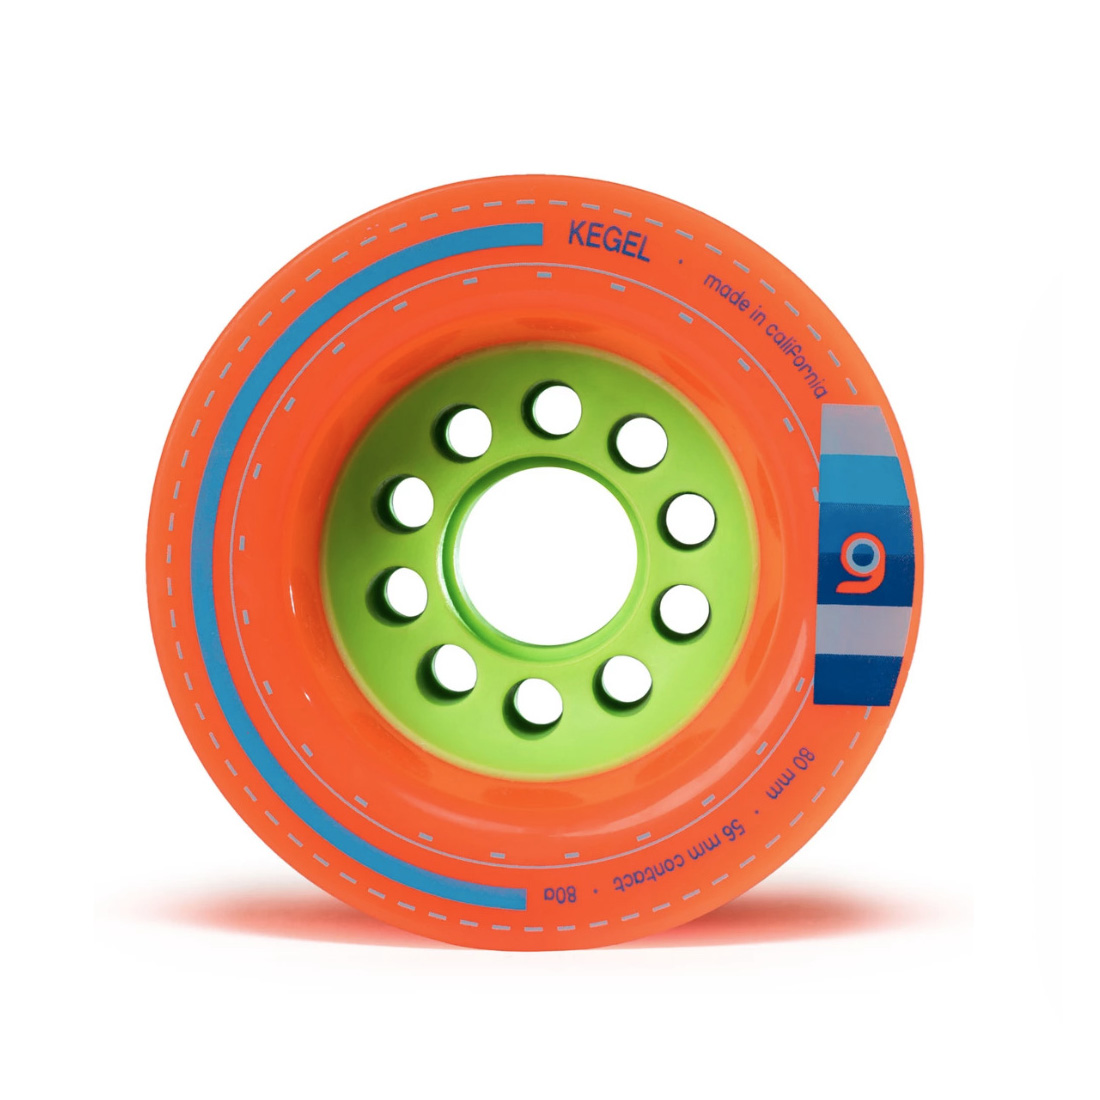
Kegel Core Examples:
- Orangatang 80mm Kegels/85mm Caguamas
- eBoardStfuff 90/100mm HyperDrives
- Ollin 90mm Popocas
- Boa 100mm Constrictors/90mm Hatchlings/80mm Sigmas
- TorqueBoards 110mm Torques
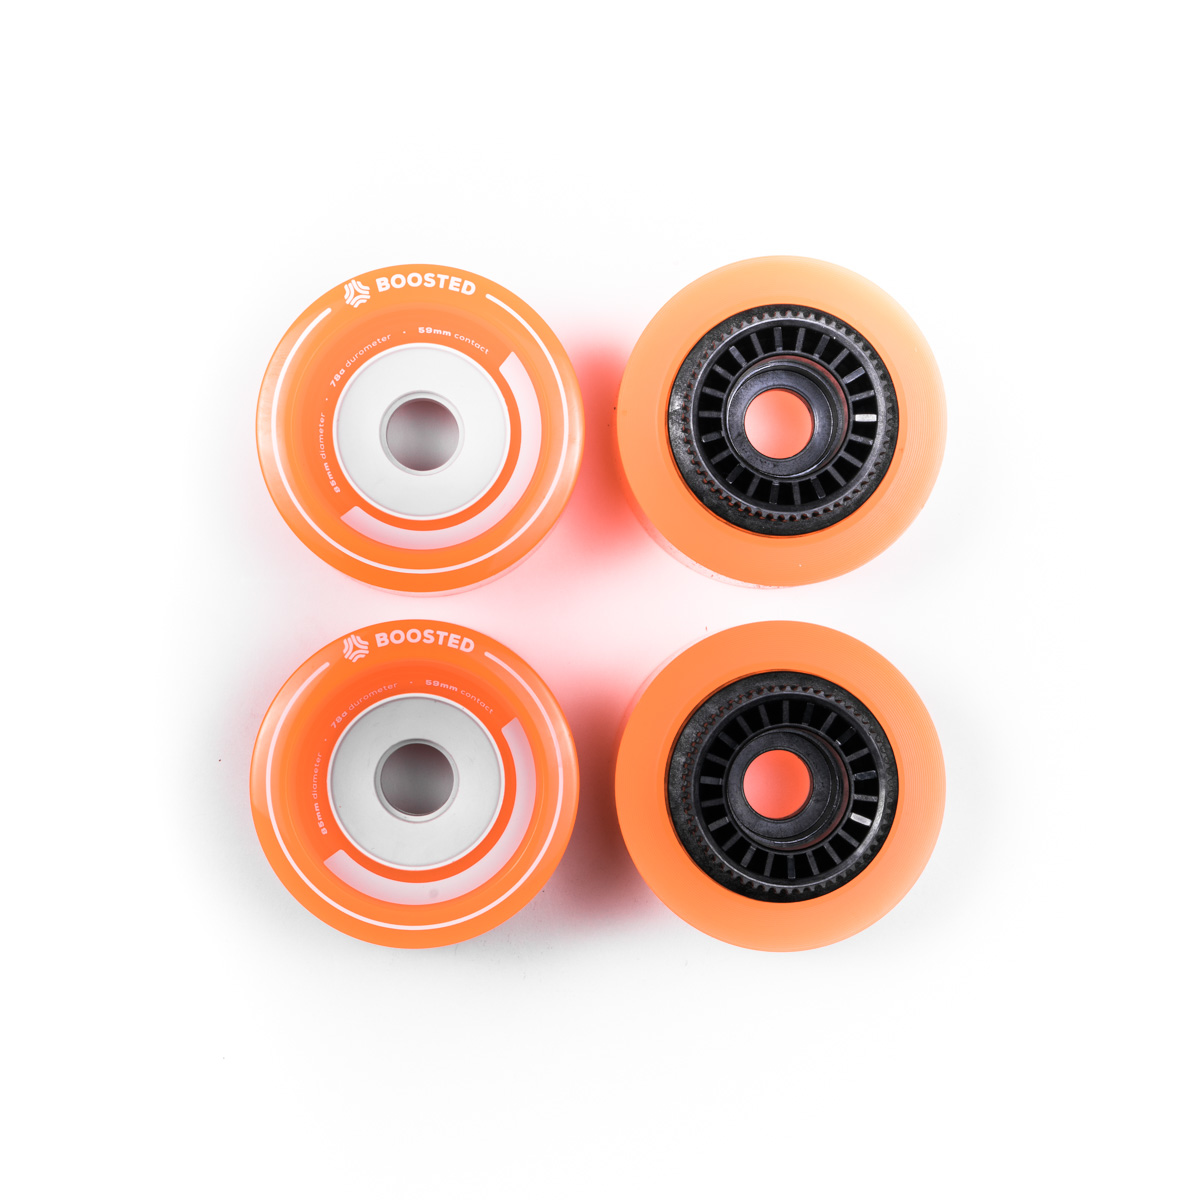
This is an ABEC11 Flywheel and the core is the orange plastic part in the centre, where the pulley sits from the inside.
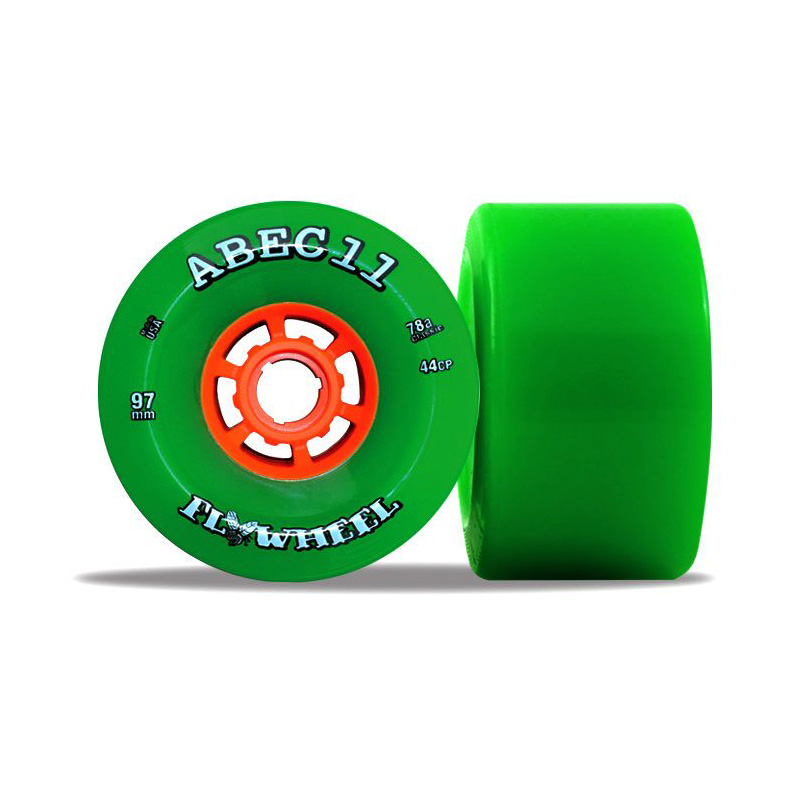
ABEC11 Core Examples:
- All ABEC11 wheels over 76mm
- Evolve 83/97mm GT/GTR Street Wheels
- Lazyrolling 97mm Glows
- MBS 100mm All-Terrain Longboard Wheels
- I-Wonder 120mm Cloudwheels
Wheel pulleys (or drive gears) are the plastic parts that sit inside the rear wheels, which connect to the motor belts. They can also be partially metal, like on the Stealth, or completely metal, like EboardStuff's modular pulleys or Romp's ATOM pulleys. This is the stock v3/v2 56T plastic pulley (v1 is 50T):
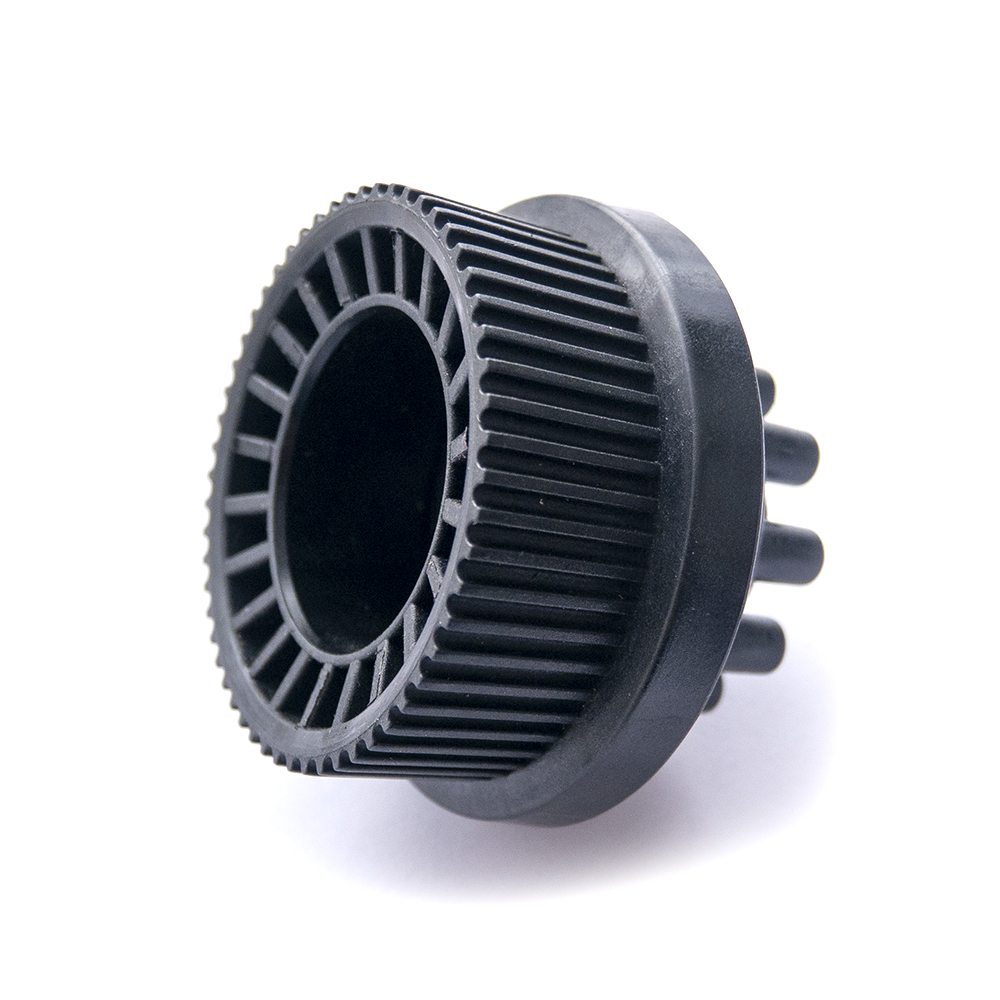
They can last longer as they are less susceptible to chipping/deforming and are slightly quieter, but they are also much more expensive. Hard plastic pulleys (often 3D printed) perform fine and can last for thousands of miles. NOTE: The Stealth comes with metal pulleys, however, only the teeth are made of aluminium and the rest is plastic.
First, remove the wheels from your board. This video shows how to remove the motor caps (belt covers), rear drive wheels, and belts at the 55-second mark:
Boosted Boards - 2nd Generation Service Video: How to Change a Belt (Without a Tensioning Tool)

If you're reusing the current pulleys and moving them onto different wheels, carefully pry them out of the wheels with a flathead screwdriver by going around the wheel, one spot at a time. Once they're loose, you'll be able to pull them out by hand. If you have metal pulleys, use a plastic tool instead of a screwdriver to avoid damaging the pulley.
Next, insert each wheel pulley into the back of the wheel by aligning the pulley with the wheel core. Press the pulleys into the wheels by hand as much as possible, checking to make sure they're fitting evenly. You can use a rubber mallet to even them out.
Put the wheel on the truck axle and spin it by hand – if it spins evenly and doesn't wobble, re-install the belts, wheels, and motor caps; if it wobbles, adjust the fit by pressing the pulley in further or prying it out wherever necessary. Keep in mind that the wheel doesn't need to be 100% even as a slight wobble won't be noticed while riding. If you're installing bigger pulleys than before, you'll need to re-tension your belts or use different belts if necessary. Tightening the axle nut may also affect the fit and pressing it further in to be flush with the wheel.
This comes down to personal preference. Boosted sold their 105mm wheels with the stock 56T pulleys. If you want to keep the stock gear ratio, which gives you stock top speed and acceleration/braking performance, you’ll need to use custom pulleys with higher teeth count and bigger belts for bigger wheels. For example, 63T for 90mm, 68T for 100mm, and 75T for 107mm wheels. Using stock pulleys with bigger wheels will increase the board’s top speed, but decrease the acceleration/braking performance and can drain more battery.
Pulleys!!!

This isn't necessary on the longboards as the decks have adequate cut-outs for bigger wheels, but you'll probably need to add an extra 1/2" riser on the Mini if you use wheels bigger than 90mms to avoid wheel bite. Otherwise, your trucks will need to be very tight.
Yes, they’re 6903 2RS bearings, which can be bought as a pair on eBay for under $7 USD.
Typically, no. Slices from sharp objects shouldn’t affect the ride once removed and can be covered with super glue. Minor chunking is expected over time, but major chunking that deforms the lip profile can affect the ride feel. Some wheels can last for thousands of miles.
Troubleshooting
This is a common issue with multiple possible solutions. Start off by trying to narrow down the noise to the front or back of the board and determining whether the noise is only present while riding or while stationary as well.
Tighten all screws and use Blue Loctite if necessary, particularly, on the motor caps (belt covers) as they often become loose and rattle while riding.
Check your bearings – often, the axle nut is too tight and will cause one or more bearings to click. Using a skate tool, tighten the nut until it is tight and then back it off a quarter turn or so until the clicking stops but there is no lateral movement of the wheel. Another remedy is to use a little white lithium grease on the bearing seats (where the bearing rests in the wheel).
If you’re experiencing squeaky trucks, remove the hanger and put some shaved pure paraffin wax (don't use a candle) in the pivot cup and in the bushing seats. Re-assemble the truck as it was previously and you should have less noise from the trucks.
The accessory port cable under the front and back trucks can also rattle if the foam pad is too deformed and doesn't absorb the vibrations.
Early v3 motors can make a grinding noise when the motor pulley becomes loose as a result of excessive space between the motor's outter bearing and shaft, which doesn't affect performance, but can be very loud. To check for pulley play, uninstall the motor and wiggle the motor pulley – if it feels loose and makes a clicking sound, it is likely the culprit. This issue was later fixed in production.
If your board is making a loud sound while braking, tighten your belts. Debris and stones can get caught in the belts, which can also cause rattling noises.
Boosted Boards - 2nd Generation Service Video: How to Change a Belt (Without a Tensioning Tool)
If you have been riding with loose belt tension for an extended period of time, be sure to check your current belts. Inspect the belt teeth because they may need to be replaced due to accelerated wear from belt slippage. Proper belt tension helps expand the life of belts.
Yes, the motor drive enclosure and battery are not completely flush with the deck while stationary to allow the deck to flex when bearing weight.
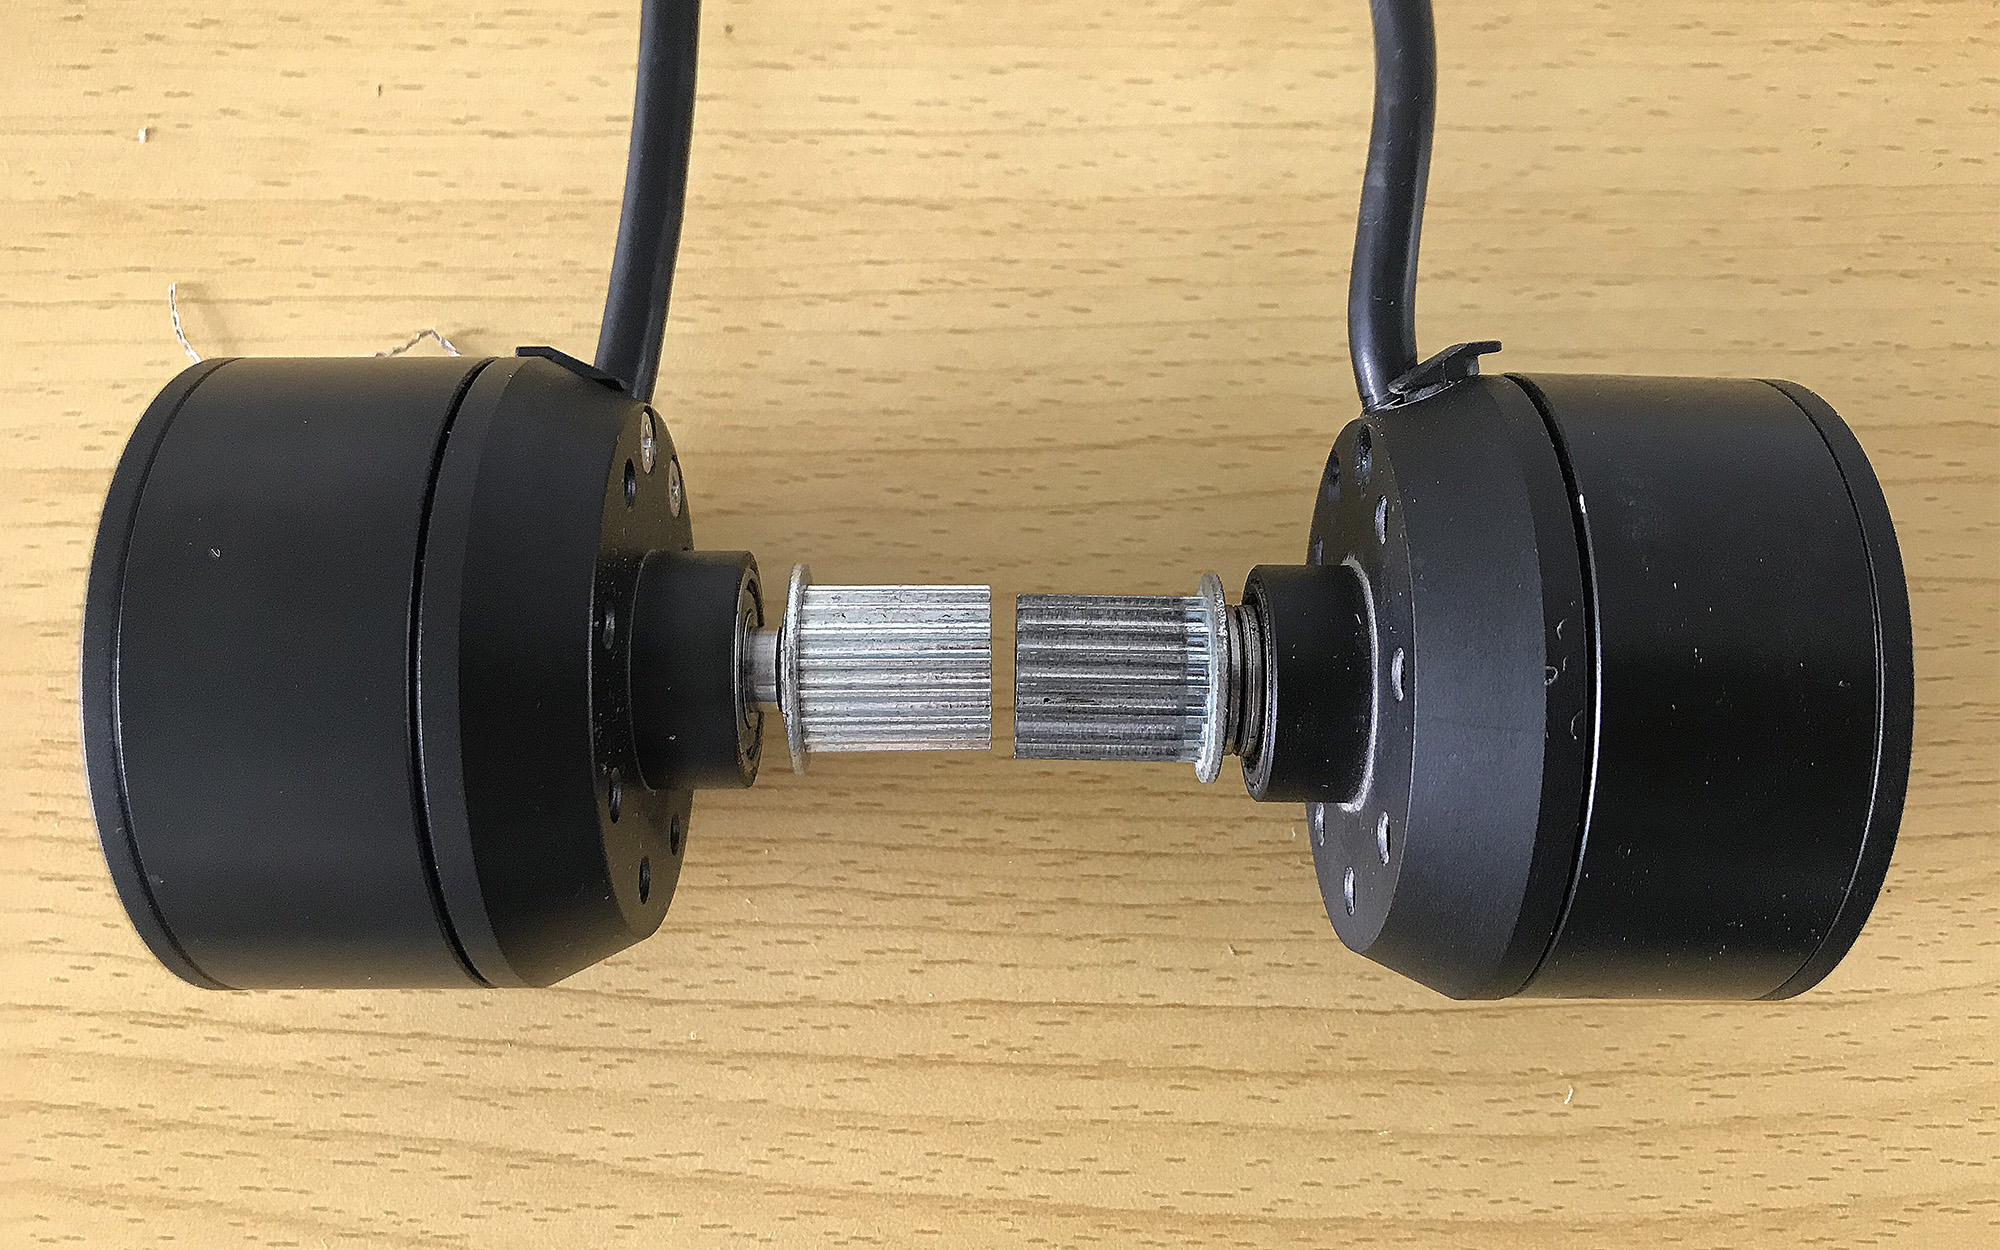
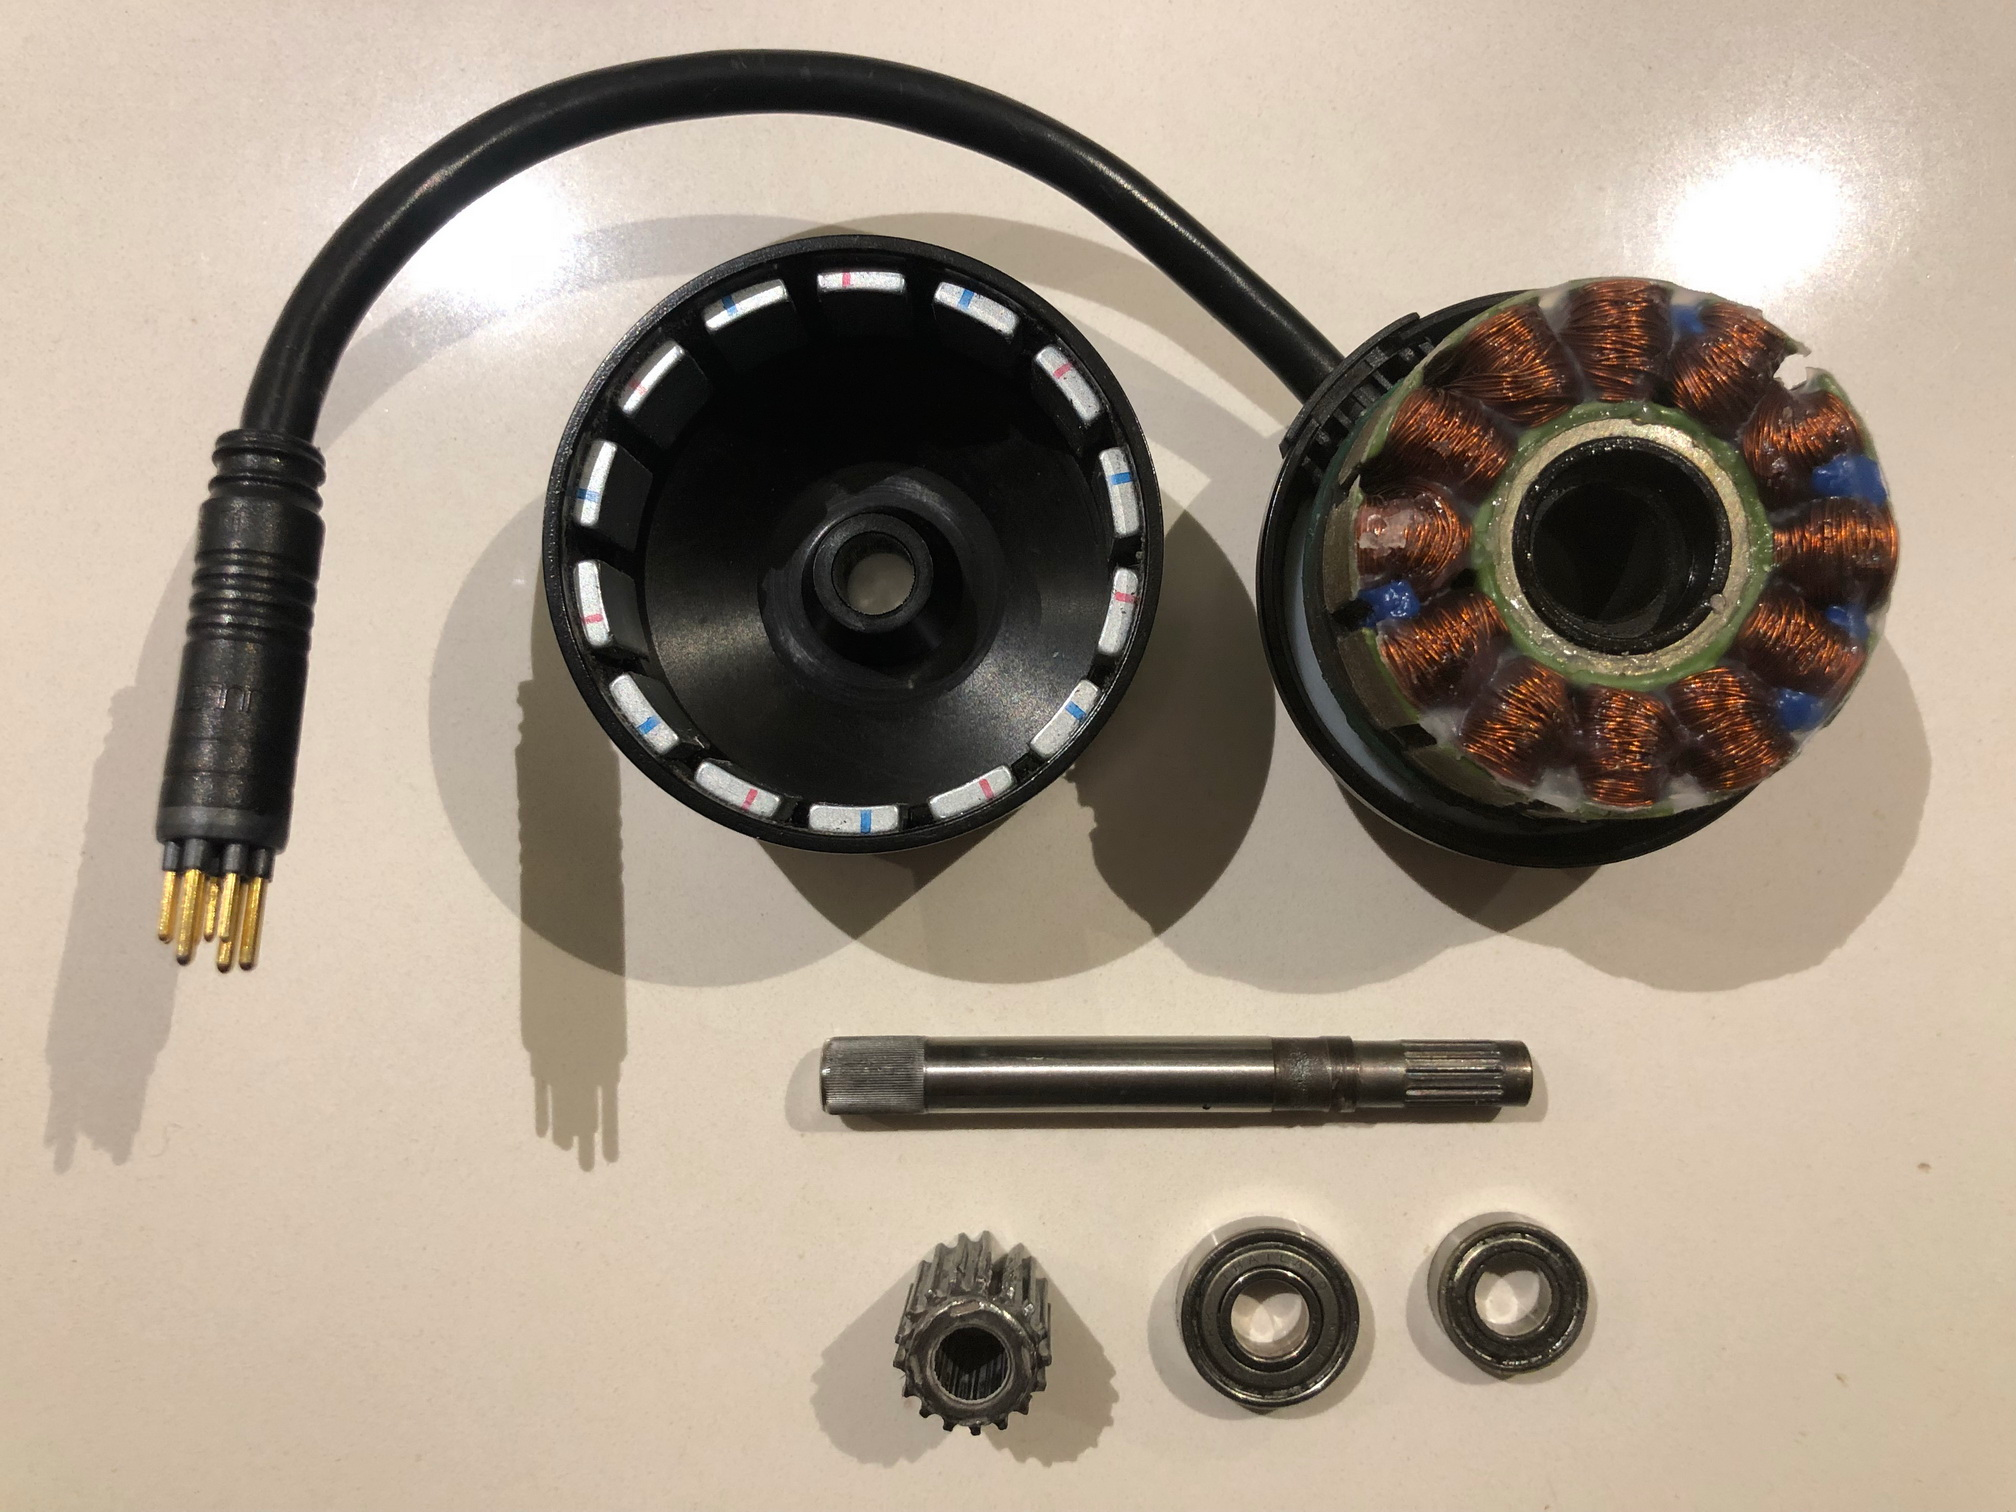
The original v3 motor looks the same as the v2 motor, but uses the wrong outter bearing, which had a much lower RPM rating that fails, heats up, and wears the shaft. The revised v3 motor uses the correct bearing and removes the washers (shim stack) under the motor pulley, which allows the motors to be assembled faster. This change makes telling the motors apart easier. The revised motors can be found on boards with serial numbers above Sx910xxxx and have T3xxxx serial numbers on them while the original motors have T2xxxx serial numbers. Here is a comparison of a revised (left) and original (right) v3 motor:
A few stores are offering OEM motor replacements, including The Boosted Guys, Boosted USA, and Fatdaddy. In terms of repairs, eBoardStuff is offering a repair/upgrade service on motors “as long as they still spin” with a lifetime warranty.
Early v3 motors can make a grinding noise when the motor pulley becomes loose as a result of the motor's outter bearing failing and wearing down the ~8mm shaft, which creates excessive space between the motor's outter's bearing and shaft. This doesn't affect performance, but can be very loud. To check for pulley play, uninstall the motor and wiggle the motor pulley – if it feels loose and makes a clicking sound, it is likely the culprit. The revised motors can be found on boards with serial numbers above Sx910xxxx and have T3xxxx serial numbers on them.
If you know what you're doing and the motor shaft doesn't have any wear yet, you can attempt a repair yourself. You'll need to open the motor by heating up the pulley since it's not removeable (preferably, at 220° C; minimum of 160° C) and removing it once it's hot enough (glowing red). Then, you can remove the original NMB R-1980-KK (8x19x6 mm) bearing and replace it with an similarly sized bearing rated for high RPMs (NMD/SKF). For reference, the inner/smaller bearing is a NMB L-1680K (8x16x5mm). Finally, put the motor pulley back on and apply Loctite 603 (AKA Green Threadlocker) to the shaft. Alternatively, a mechanic may be able to remove the pulley using a pulley remover (AKA battery terminal/wiper arm puller).
This video shows an alternate method of opening (and re-building) a motor, however, since the motor pulley is replaced with a 20T version, the original pulley is destroyed in the process:
Boosted Board Brushless Motor Repair and Speedhack

The "RLOD" (red light of death) errors on extended range batteries are mostly permanent errors triggered by the BMS (battery management system) when it detects a problem with the battery. The blinking LED patterns can range from issues with a loose battery and/or motor connector(s) to damaged battery cells and/or a faulty ESC.
The most common case of RLOD is exhibited when the power button blinks red three times on repeat and the 80% light on the battery indicator is solid, like so:
Technical Info:
This error is caused by a voltage imbalance, which means that any cell pair reaches more than 0.5V of charge difference. Letting a board sit for too long without using it will cause a voltage imbalance. It's recommended to check on the board and turn it on at least once every two weeks and, if possible, riding it a couple of times a month. On firmware v2.1.7 or earlier, it's best to cycle the board (fully discharge and recharge it) semi-frequently to keep power moving through it.
Early versions of the battery firmware don't balance the power output from each cell as efficiently and turn the power button green when the cell with the highest charge reaches ~4.0V. This means that if other cells are still below ~4.0V, you will have no indication, which can lead to a voltage imbalance. The BMS (battery management system) associates the charge percentage with the last known powered-on voltage. If the battery sits for a month and the internal voltage drops, the BMS will re-associate the last-known percentage it was previousy at with the new voltage it's on. If you turn off your board at 100% and ~4.0V, it sits for a month, and drains down to 3.5V, when you turn it back on, it will now assume that 3.5V is 100%. If a voltage imbalance occurs during that time, you will have a short amount of use before the battery goes into error.
The latest battery firmware balances the cells better by showing 100% charge when the delta is <100mV and maintains the balance better while not in use by tolerating a delta of ~1.0V. Once the battery shows 100% charge, the cells will balance at a rate of 20-25mV per day. v2.5.1 and the Rev's battery firmware can still experience issues where they will get "stuck" at odd percentages when a cell pair doesn't reach charge. A common solution for this is to simply leave the board plugged in to the charger until the battery finishes balancing and the power button turns green, which can take several days or weeks.
Cell-balancing only occurs while charging and can take up to 2-3 weeks on firmware v.2.1.7 or earlier. The BMS charges and discharges the battery below its full capacity to increase its lifespan, so leaving the board charging after the power button turns green should not damage the cells.
Battery Status Codes:
The light on the power button indicates the board's status or severity of an error while the battery indicator lights indicate the component that is experiencing the error in varying combinations. If multiple components have failed simultaneously, the lights will reference the most severe error. SR and XR batteries may share some status codes, but they are categorised here as they were recorded.
Error Location Legend:
- Charger
- Battery
- Deck Wiring
- ESC
- Motor(s)
SR/XR Status Codes:
Powered on and connected to ESC.
Powered on and charging battery (battery indicator lights will vary depending on charge level).
Powered on and in Bluetooth pairing mode.
Powered on, but not connected to ESC (e.g. charging battery disconnected from board).
Powered off or power button unresponsive due to burnt fuse – test another battery.
XR Status Codes:
Possible overheating/general error.
Charger issue (not providing expected voltage or amperage) – test another charger.
Battery charging issue – test another battery.
Battery issue – test another battery.
TBD.
Connection issue between ESC and battery (remote beeping, brakes will work, ability to accelerate will gradually be lost) – reconnect battery, otherwise, apply DeoxIT connector lubricant1.
ESC and battery possibly overheating – let the board rest for 20 minutes before powering on again.
Deck wiring connection issue – apply DeoxIT connector lubricant1 and reconnect battery connectors, otherwise, repeat on the ESC connectors.
ESC connection issue – reconnect ESC or test another ESC.
Motor overheating and/or malfunctioning – let the board rest for 20 minutes before powering on again/apply DeoxIT connector lubricant1 and reconnect, otherwise, replace motor.
Connection issue between ESC and battery (remote beeping, brakes will work, ability to accelerate will gradually be lost) – reconnect battery, otherwise, apply DeoxIT connector lubricant1.
Battery issue, most likely, overheating (remote beeping) – let the battery rest for 20 minutes before powering on again.
ESC issue, most likely, shorted/burned – replace ESC.
Charger issue (possible water ingress) – dry the charge port and charger before re-attempting to charge, otherwise, test another charger or battery.
RLOD error due to cell voltage imbalance (most likely), damaged cells, or faulty BMS – reset error in BMS2, otherwise, replace battery.
Firmware error – ESC and/or remote needs to be updated (e.g. ESC firmware is not compatible with connected XR battery), otherwise, check cables.
SR Status Codes:
Connection issue between ESC and battery (remote beeping, brakes will work, gradually lose ability to accelerate) – reconnect battery, otherwise, apply DeoxIT connector lubricant1.
Short circuit error – replace BMS/ESC.
Battery charge level low (battery dead cell(s) have low or no voltage).
RLOD (battery cell(s) have low or no voltage).
Voltage spike.
Voltage spike.
RLOD (voltage imbalance or dead battery cells).
RLOD (faulty BMS).
RLOD (invalid battery cell count/faulty BMS).
RLOD (water damage).
RLOD (shorted BMS MCU).
Overcharge error.
BMS power terminal disconnected.
RLOD (no/dead battery cells detected).
Low charge voltage – replace charger.
TBD.
1. See this guide or video below.
2. jonataubert has managed to clear the RLOD status by editing the data stored on an SPI flash chip on the battery, which allows the battery to be charged again. This method requires special tools and opening up the battery. See the Parts & Repairs page for available battery repair services.
Boosted Boards - 2nd Generation Service Video: How to Change a Battery with Connector Lubricant

The necessary connector lubricant (DeoxIT D-Series D100L Mini-Brush Applicator) can be purchased on Amazon.
Since most cases of RLOD are caused by a voltage imbalance, which means that any cell pair reaches more than 0.5V of charge difference, you can practice the following tips to help preserve your battery's health. NOTE: Not doing any one of the following likely won't be a direct cause of a RLOD, but they can contribute to an error over time.
- If you're on the latest battery firmware (v2.5.1), RLODs are significantly less likey and you should be able to rely on the green power button to determine whether your battery is fully charged and balanced. It should also be safe to disconnect the board from the charger once fully charged. Leaving your board plugged in after fully charging won't cause any damage as the BMS doesn't use 100% of the battery's capacity. This means that what the board shows as 100% or 0% charged don't represent the battery's actual capacity.
If you're on battery firmware v2.1.7 or earlier, leave your board plugged in to the charger for at least two weeks1 ASAP as a preventative measure, even after the power button turns green to make sure the cells are balanced. You can divide this into several days or a week at a time as long as the total sum is at least two weeks. After this, leave your board plugged in as often as possible or for 1-3 hours after the power button turns green after each charge1. Click here to check your firmware version. - Let the board fully charge before disconnecting it from the charger.1 Since the BMS only balances the battery while charging, disconnecting it before fully charging won't allow it to properly balance, which can increase the chances of a RLOD.
- Turn on the board at least once every two weeks and, if possible, ride it a couple of times a month. On firmware earlier than v2.5.1, it's best to cycle the board (fully discharge and recharge it) semi-frequently to keep power moving through it.
- Don't store the board for long periods fully charged or discharged. You should store your board indoors and charged at approximately 20-80%. Make sure the battery is balanced by following the steps above before riding it down to a lower charge level for storage. The battery should also be charged every 6 weeks as all batteries self-discharge a small amount and your battery may drain so low that it becomes damaged.
1. Based on Robert Scullin's beambreak project research.
When charging a battery on the latest v2.5.1 firmware, the power button may stay red for longer with the battery indicator appearing to stop below 100%. This is normal and happens when the BMS detects imbalanced cells, resulting in the battery getting "stuck" on a specific percentage while charging. To fix this, simply leave your board plugged into the charger until the power button turns green. In some cases, this re-balancing can take several days or weeks. You may continue using your board as normal as it is safe to ride before the battery is fully re-balanced, but try to charge it until the power button turns green ASAP to prevent a RLOD. Once the battery is re-balanced, you can resume charging it like normal.
The official Boosted app has slowly been losing functionality as Boosted's servers go offline. First, it lost the ability to update boards' firmware and then, the ability to log into a user account, which provided the ride-tracking, board registration, and events features. The app can still connect to boards and display the odometer/trip meter, ride modes, and Beams controls.
Yes, the small amount of light is normal. The extended range battery has some internal status LEDs and the light you see is the LED blinking as the battery finishes shutting down.
Since both of Boosted's back-end servers (profile and firmware) are down, the app is most likely not causing ride modes to be lost/removed from boards and it's more likely an internal ESC/motor driver failure. The app has no way of communicating with Boosted and therefore, cannot run any commands on boards over the Internet. As a result, this cannot be prevented by uninstalling the app.
Losing hyper mode can be caused by a firmware glitch. On rare occasions, it’s an issue with the remote, but most of the time, it’s a ghost bug that can occur in the ESC, which locks it out of the fifth (Hyper) mode after connecting to the Boosted app. This can happen when there is a mismatch between the code on the motor driver and what code the back-end database expects, which causes the board's profile to change.
Unfortunately, the easiest solution is to install a new ESC with a corresponding longboard or Mini replacement.
Venutech has successfully flashed a memory dump from a Stealth ESC on a Mini X, which can enable Hyper mode on other v3 boards and also restore lost ride modes.
The ESC firmware version isn't displayed in the official Boosted app anymore and the battery firmware version in the board registration page doesn't update after the initial registration, so you can use a third-party development app called LightBlue on iOS and Android, and follow the steps below.
Alternatively, you can check your board's firmware versions, serial numbers, odometer, and ride modes on a desktop here. You can also check your remote type/firmware version here. Both tools require a desktop Chromium browser, such as Chrome, Edge (v79 or later), or Brave.
Find your ESC and battery firmware version (new method):
- Get the Ride app for iOS or Android.
- Connect to your board.
- Tap on the board info bar at the top and scroll to the bottom of the page.
Find your ESC firmware version (old method):
- Open the official Boosted app and connect to your board.
- Once connected, open LightBlue (leave the Boosted app running in the background).
- Tap on the "Peripherals" tab and select your board.
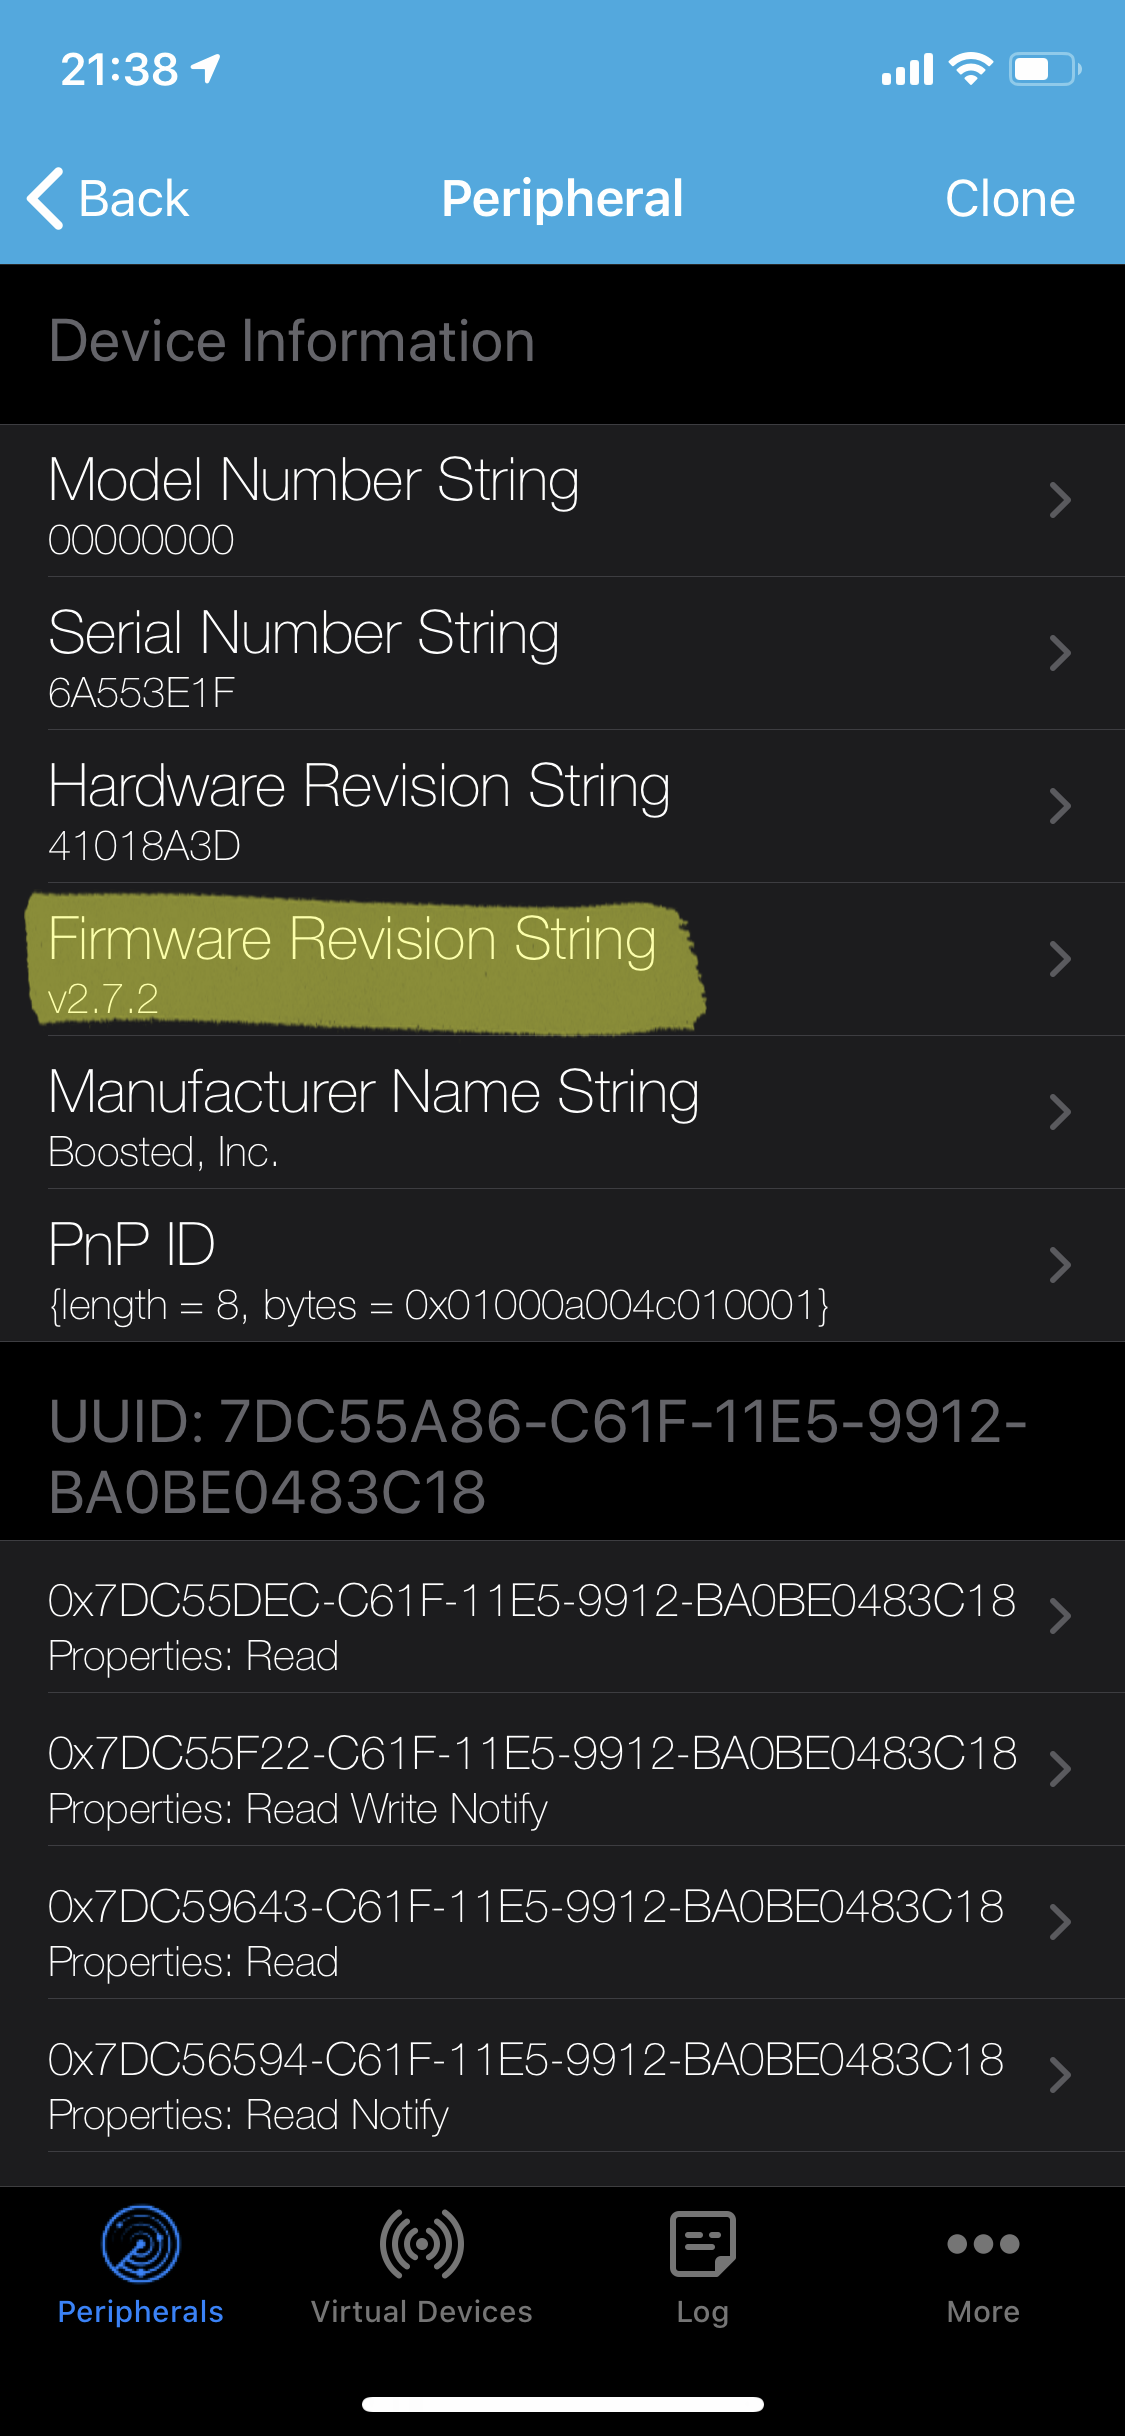
- iOS: Once LightBlue connects to your board, it'll show a page with multiple sections – the ESC firmware version is under "Device Information" > "Firmware Revision String".
- Android: Once LightBlue connects to your board, it'll show a page with multiple sections – tap on "Device Information" > "Firmware Revision String" and change the date format from Hex to UTF-8 String. the ESC firmware version is below the "READ/INDICATED VALUES" heading.

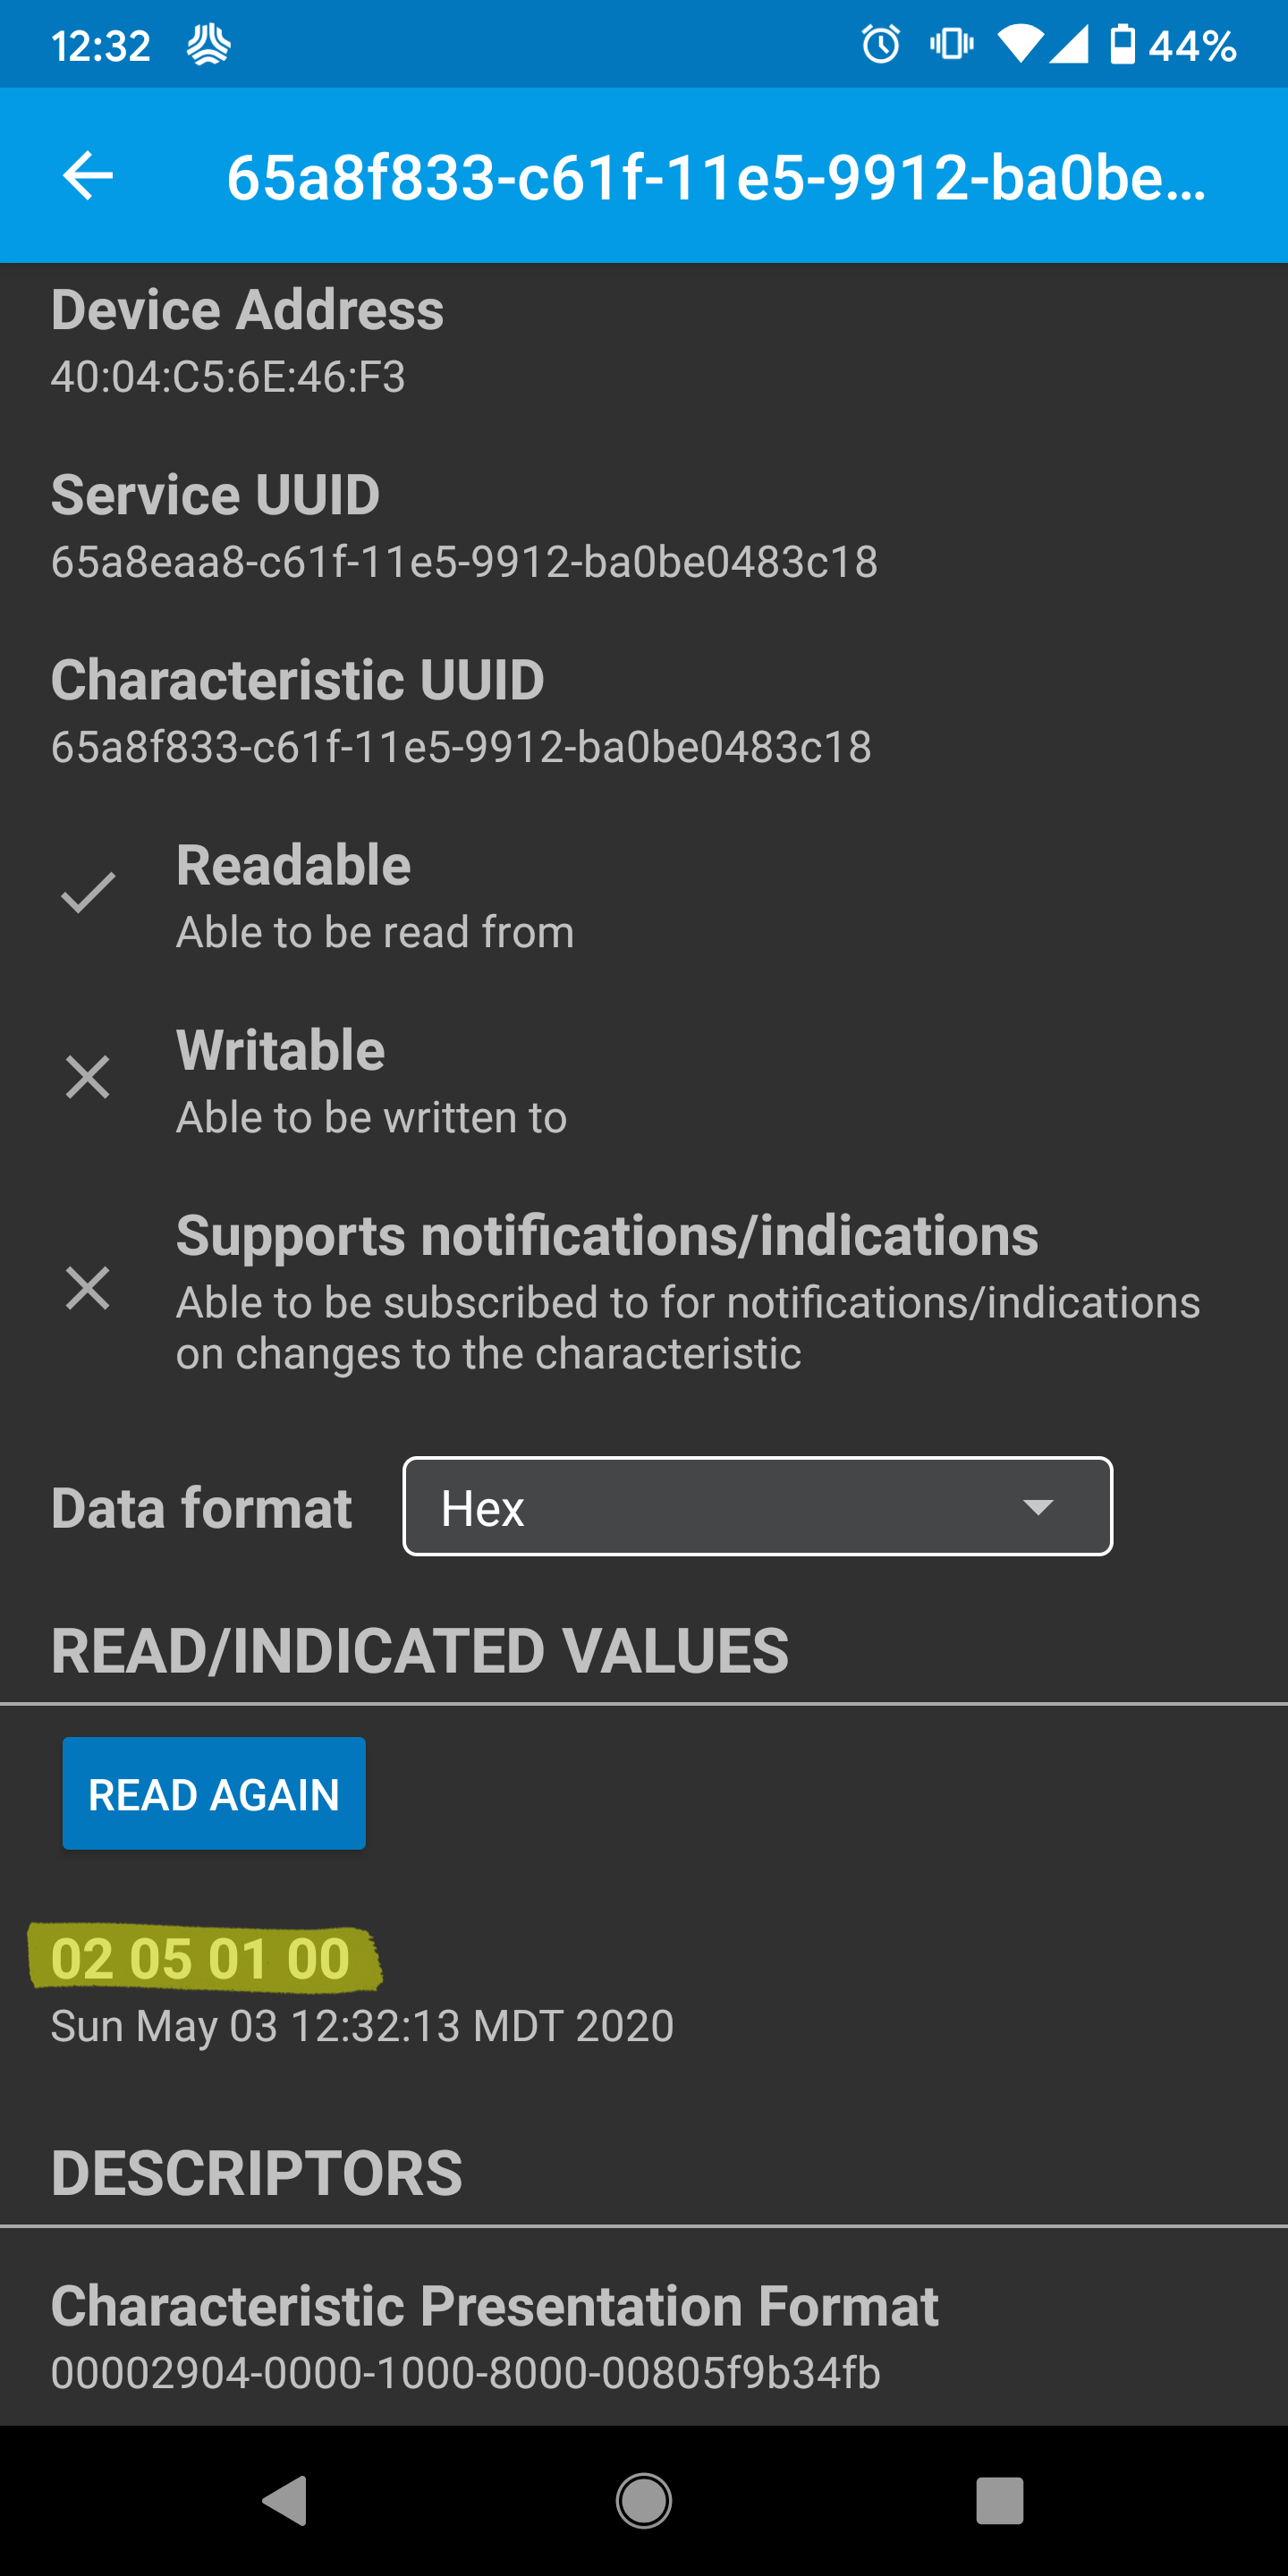
Find your battery firmware version (old method):
- Repeat steps 1-3 from above.
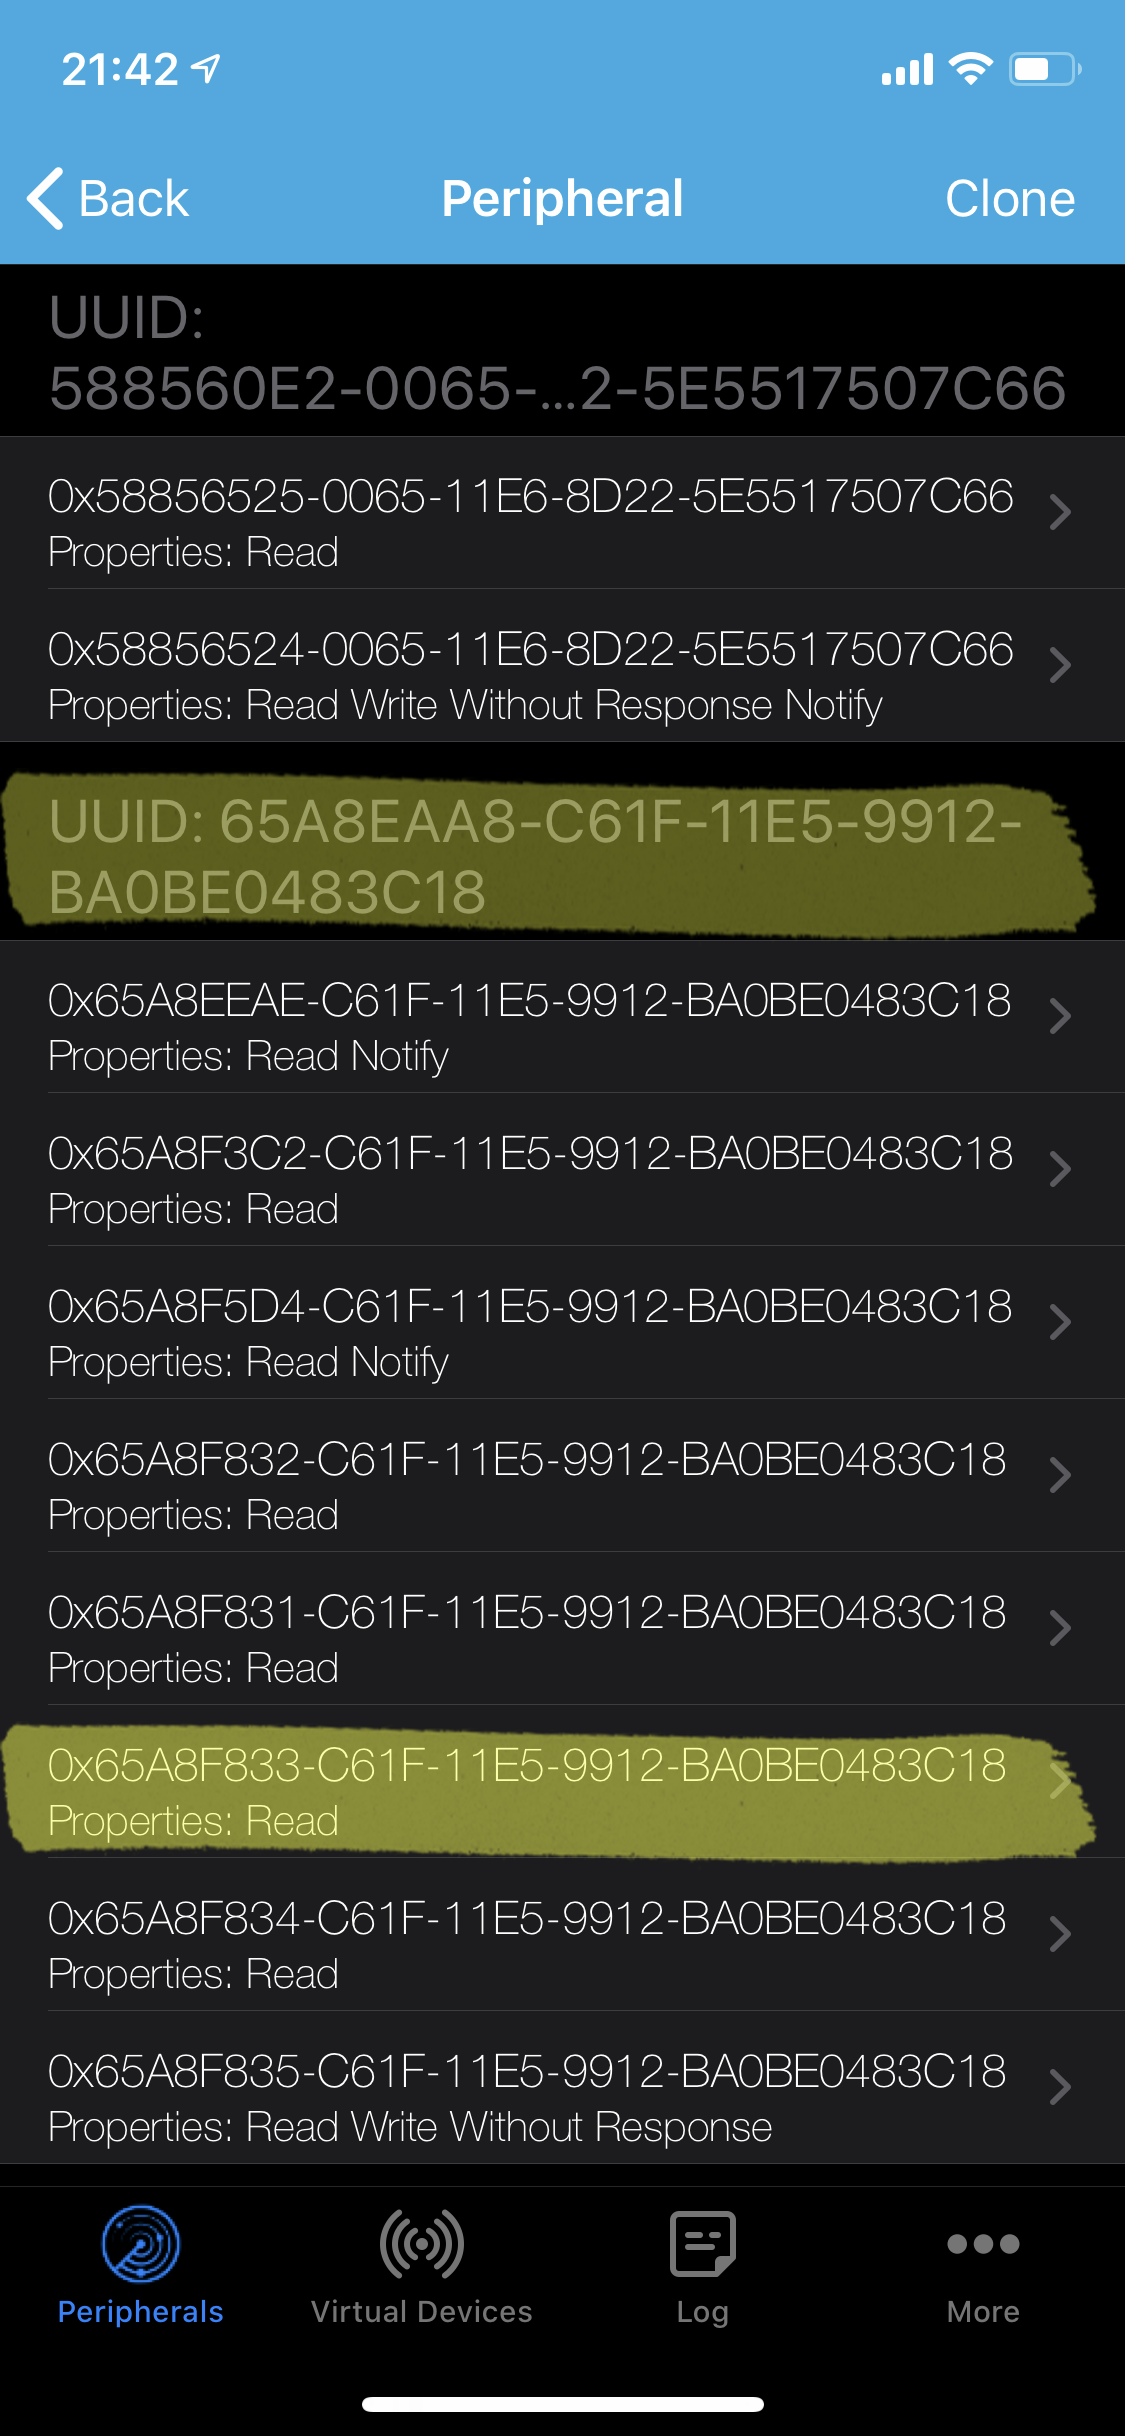
- Scroll down to the section titled "UUID: 65A8EAA8-C61F-11E5-9912-BA0BE0483C18" (this is the second-to-last section on the v3/v2 longboards and the last section on the Mini S/X).
- Tap on the option that starts with "0x65A8F833" (this is the third-to-last option).
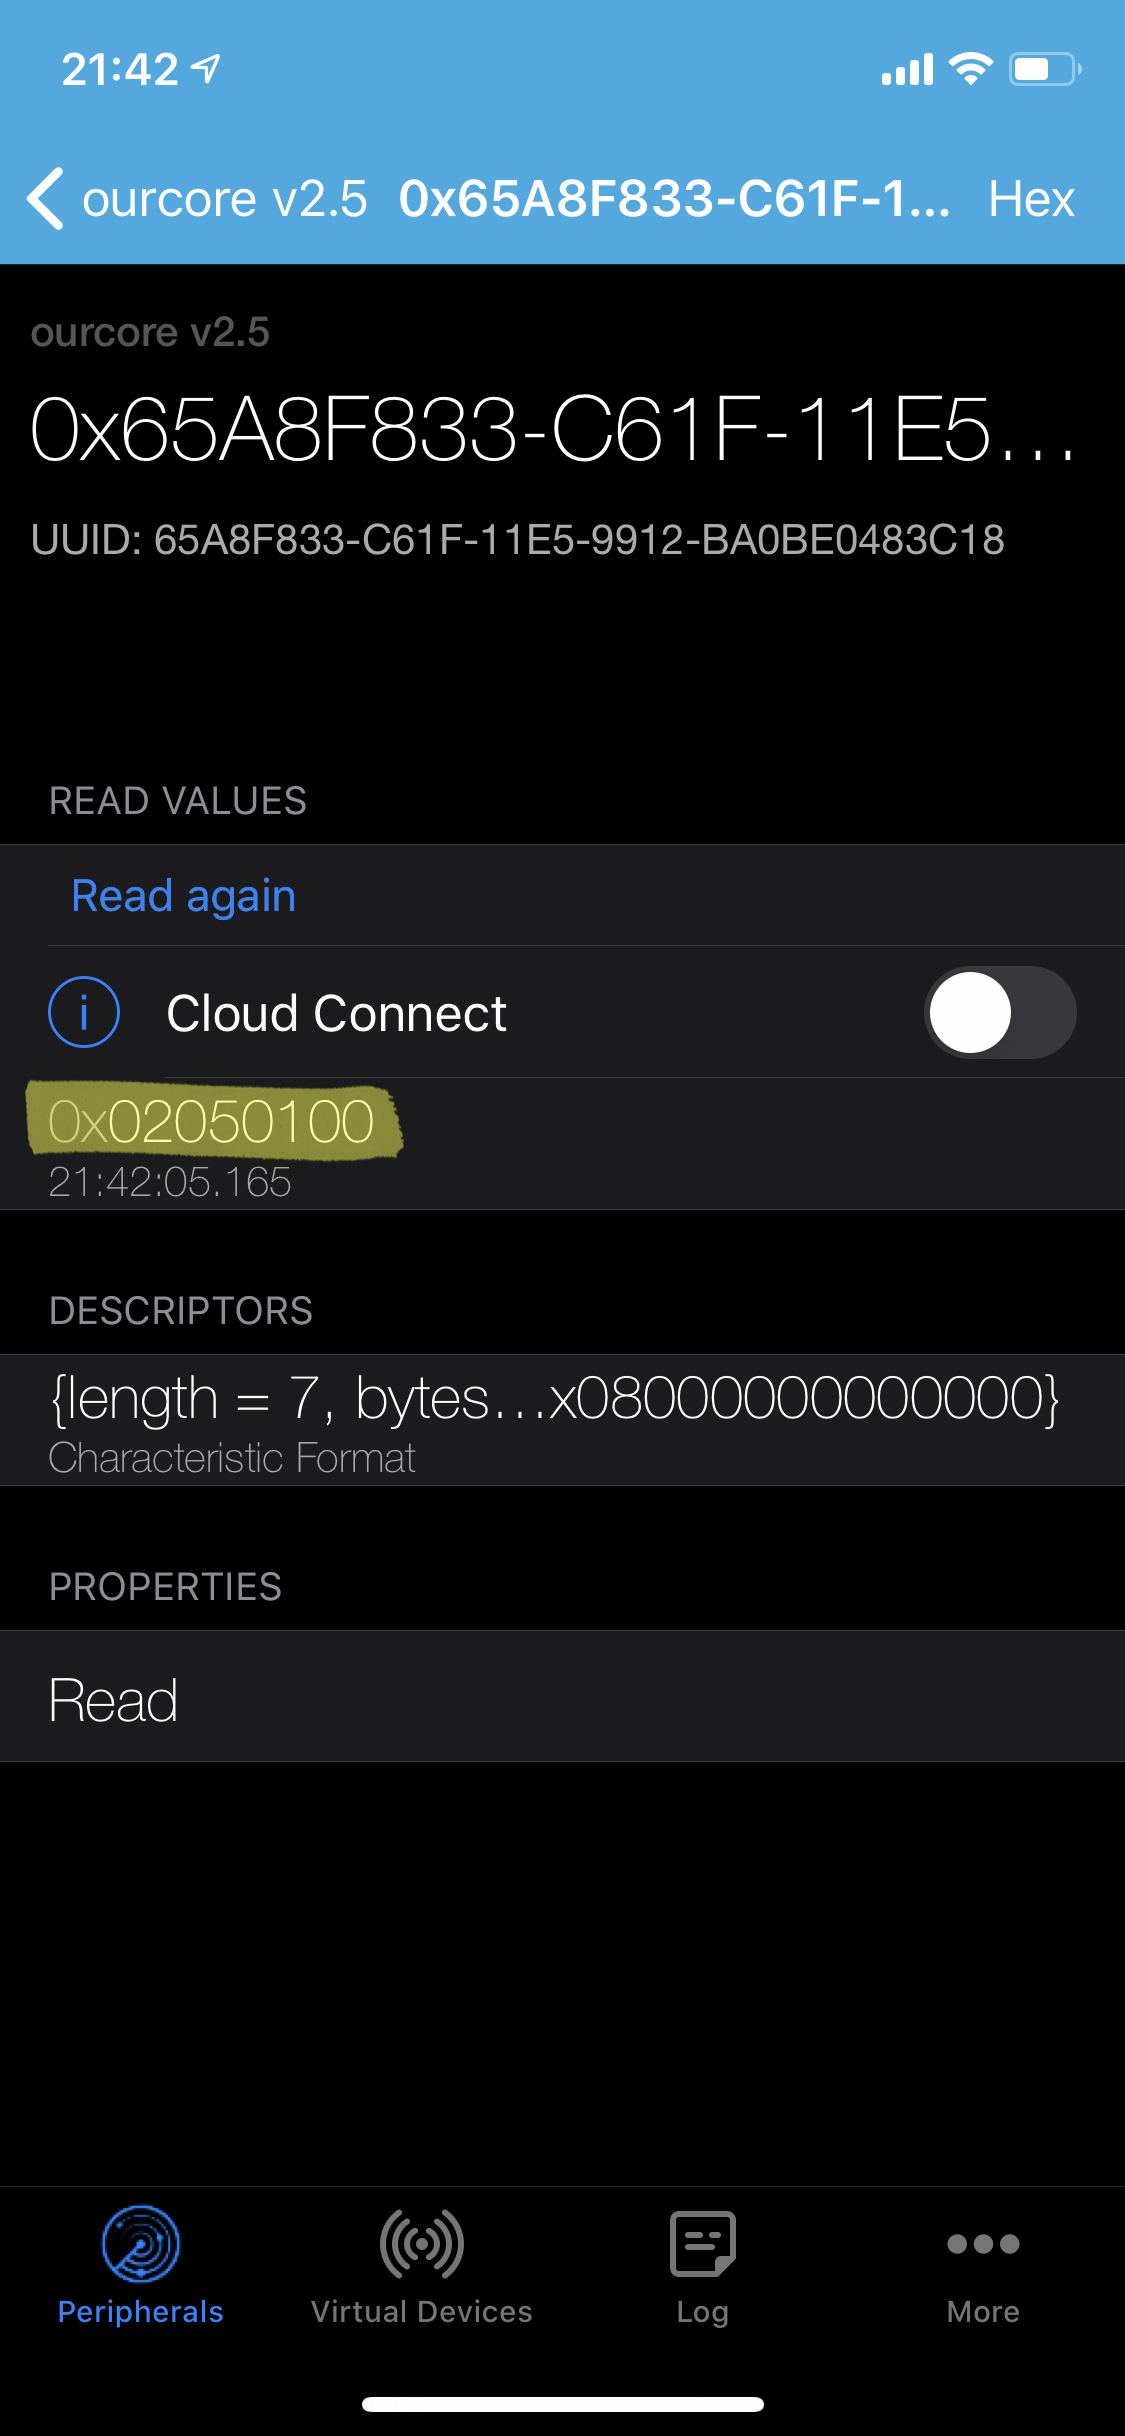
- iOS: The battery firmware version is below the "Cloud Connect" switch, but it's not immediately legible – read it by ignoring the zeros; so, 0x02050100 would be v2.5.1 and 0x02030300 would be v2.3.3.
- Android: The battery firmware version is below the "READ/INDICATED VALUES" heading, but it's not immediately legible – read it by ignoring the zeros; so, 02 05 01 00 would be v2.5.1 and 02 03 03 00 would be v2.3.3.
This is completely normal. The wheels do not necessarily rotate at the same speed; for instance, while turning, the outer wheel turns faster than the inner wheels. The wheels are independently torque-controlled and very small differences in friction (belts, motors, bearings, etc.) will cause the wheels to spin up at a different rate when they are upside down and not bearing any weight.
This is completely normal. A very small difference in angle that the wheel pulley is attached will cause the belt to ride from one side of the pulley to the other. This is well within specifications and shouldn't affect the performance of your board at all.
This can mean several things. If one of your motors isn’t spinning, check that its cable is not loose by disconnecting and reconnecting it, making sure to align the printed arrows on both cables. You can also apply connector lubricant (DeoxIT D-Series D100L Mini-Brush Applicator) to both cables (connector holes and metal pins). If the issue persists, the motor may need to be repaired or replaced. Sometimes, this can be temporarily fixed by power cycling the board and remote and you may need to re-pair the remote to the board.
If both motors are spinning normally and the remote is beeping, check that the battery cable is not loose by tightening both connectors with Boosted’s battery connector tools. If you don't have a pair and can 3D print your own, use this file. If the remote continue beeping while riding, can use the same connector lubricant on the battery connectors. NOTE: Do not use pliers to tighten or loosen the connectors as they will easily damage the threaded metal rings. The remote may also beep if it experiences a Bluetooth disconnect.
First, try re-pairing the remote to the board by pressing its button five times; press the button on the battery five times too. The remote and battery will blink blue and they should pair. If the remote still can't connect, check if the Boosted app can connect to the board – if it can, the Bluetooth module on the board may be faulty, which requires the ESC to be replaced. You can also try a different remote to make sure the remote isn't faulty.
It's fine to continue riding the board home if a belt breaks mid-ride, but keep in mind that your acceleration and braking forces will be compromised. If a motor stops spinning, you can temporarily disconnect it from the motor driver. The board should not be ridden regularly, or for extended periods of time, with only one belt or motor, as it puts extra stress on the remaining motor and belt.
The v1 only has one Bluetooth radio, so it’s more susceptible to disconnections in busy areas with interference. You should avoid riding in areas where this occurs as the behaviour can be unpredictable.
If you’re experiencing any of the following issues, your battery may have naturally discharged too far, which often happens when the board is not used for extended periods of time:
- The board won't turn on.
- The board won't respond to the charger.
- The board turns on but then displays a blinking pattern (red and green).
- The board displays a blinking pattern when the charger is connected (red and green).
To start, you need to have the wheels spinning enough to give the board a small regenerative charge.
- This can be done by kick-pushing the board for 15-20 minutes at about 10 mph, or even by being creative and having someone pull you around with a bike.
- You could also use a treadmill or a hand drill setup to get the wheels spinning for a while.
Try checking the remote or the app to see if it’s actually gaining charge after 15 minutes on the charger again. NOTE: This does not work on v2 or v3 boards.